 |
|
WebsiteExpress Tutorial |
|
| A comprehensive introduction to the WSX website template |
- note: this tutorial's table of contents can be accessed at any time by double-clicking anywhere inside the tutorial text
License
This document is copyrighted material, all rights reserved.

  (c) Information Technology Group - www.itgroup.ro
  (c) Virgil Mager

Permission is granted to copy, distribute and/or modify this document
under the terms of the GNU Free Documentation License, Version 1.3
with no Invariant Sections, no Front-Cover Texts, no Back-Cover Texts
@toc@Table of Contents@
Getting started
The present tutorial, as well as the process of creating a new website based on the WSX template, both require downloading the WSX template on a computer and then opening the downloaded copy in a web browser on said computer; however, a number of modern browsers prevent the WSX template from operating properly, such that only a specific set of compatible browsers can be used for the development of a website based on the WSX template.
Specifically, the browser compatibility situation with the WSX template at the time of writing this document is as follows:
- Opera 12 and all versions of the Chrome/Chromium browsers are known to NOT be compatible with the WSX template
- Mozilla Seamonkey 2, Firefox 10, Internet Explorer 8, and Safari 5 browsers are known to be compatible with the WSX template
- the above-mentioned browser compatibility restrictions apply only to using the WSX template locally on a computer (i.e. in offline mode) for creating/editing a website; however, all websites that are built based on the WSX template operate properly on ALL modern browsers when said websites are hosted on the internet (i.e. online)
We will here-forth use the term 'WSX-compatible web browser' to designate a browser that is compatible with opening the WSX template locally on a computer and then using the template to create a new website.
What is the WSX template
The WebsiteExpress template, or simply 'WSX', is a small, fully-functional website which is meant to serve as a template for building new, full-fledged websites from the ground up. Throughout this tutorial we will refer to a website that is built based on the WSX template as a 'WSX-based website', or simply 'WSX website'.From a website developer's perspective, the WSX template provides an easy and economical way of building, publishing, and maintaining a multi-lingual presentation-oriented website, specifically:
- the process of creating a new WSX-based website requires the prospective web developer to be familiar only with some basic web-related terminology such as e.g. 'HTML document' or 'hyperlink'; additionally, the computer-operating skills required for building a WSX-based website are also very basic, e.g. the ability to manage files and folders on a computer, edit a simple HTML document in a commonly used HTML editor such as Mozilla Seamonkey, or upload a file or folder on the internet with a commonly used FTP program such as FileZilla
- the present tutorial, which is itself part of the WSX template
website, provides a smooth learning curve for
using the template, by providing a detailed step-by-step presentation
of each of the template's features
- a WSX-based website imposes a minimal set of
conditions on a webhosting server, such that even the most
basic, and sometimes free,
webhosting plans can be used as a publishing platform, all while
providing a rich,
uncompromising user experience when browsing a WSX-based website
License
The WSX template is copyrighted software, @C@ Virgil Mager, @C@
Information Technology Group - www.itgroup.ro.
The WSX template
is free software, released under the terms of the GNU General Public License, Version 2.
Obtaining the WSX template
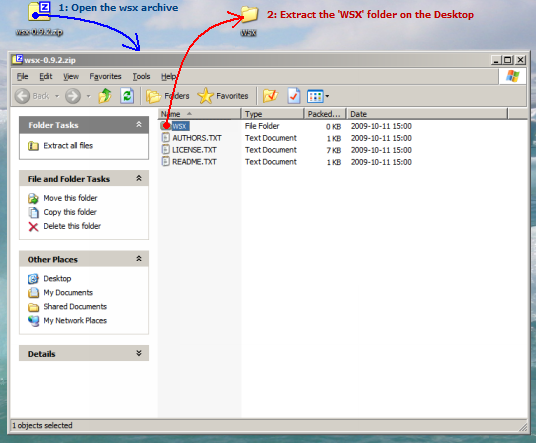
The first step to obtaining the WSX template is to download the WebsiteExpress archive from here. For the sake of simplicity, let us consider that the archive file will be downloaded on the desktop, thus obtaining a zip file named 'wsx-*.*.*.zip' where *.*.* represents the version number (e.g. the archive file might be called 'wsx-0.9.2.zip').Once the 'wsx-*.*.*.zip' archive has been downloaded on the desktop, the next step is to extract its contents using any available de-archiving method; for example, in Windows the archive file can be opened by double-clicking it, and then the 'WSX' folder can be dragged out from the archive window onto the desktop as illustrated in Fig.@count@images#wsx_extract@ below.
- important: in order to have a well-defined setup for the rest of this tutorial, we will here-forth consider that the 'WSX' folder contained in the archive will be extracted onto the Desktop, thus resulting a single folder named 'WSX' placed directly on the desktop.
-
note: the text files that can be found inside the 'wsx-*.*.*.zip' archive next to the 'WSX' folder contain ancillary information, and they are not part of the WSX template itself.
The root folder of the WSX template
The 'WSX' folder extracted from the 'wsx-*.*.*.zip' archive (see Fig.@count@images#wsx_extract@ above) constitutes the 'root folder' of the WSX template, or the 'WSX root folder', and all the files and folders that are part of the WSX template are contained inside the 'WSX' root folder. The contents of the WSX root folder (after being extracted from the 'wsx-*.*.*.zip' archive and placed on the Desktop) is illustrated in Fig.@count@images#wsx_folder@ below: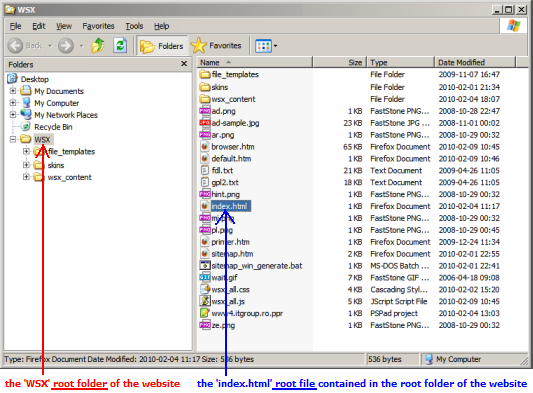
- note: the view in Fig.@count@images#wsx_folder@ above is obtained
in Windows by right-clicking the 'WSX' folder on the desktop and
selecting "Explore" from the pop-up menu
The root file of the WSX template
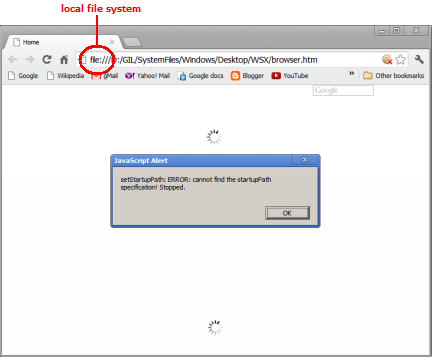
The 'index.html' file contained inside the WSX root folder and illustrated on blue background in the right-hand side of Fig.@count@images#wsx_folder@ above is the 'root file' of the WSX template, or the 'WSX root file', and by opening the 'index.html' root file in a web browser the WSX template will be displayed in a browser window.- important: as
it has been specified in the foreword of this tutorial,
the WSX template does not operate properly on certain browsers, such
that when opening its 'index.html' root file locally on a computer the
web browser might not display the template; it is thus
mandatory to use the WSX template only in conjunction with a
WSX-compatible browser
A snapshot of the error message issued by the WSX template when opened in a Chrome browser is illustrated in Fig.@count@images#wsx_template_nodisplay@ below:
- important: the present tutorial makes
extensive use of examples which can often be tested on the WSX template
website itself; it
is thus strongly recommended to actually download the WSX template and
use it as a reference by opening the template in a WSX-compatible
browser before continuing with reading this document.
What is a WSX website
As it has been mentioned at the beginning of this tutorial, we'll use the terms 'WSX-based website', or simply 'WSX website', to refer to a website that is built based on the WSX template. While the detailed functionalities of, and the detailed procedure for creating, a WSX-based website will be presented in the following chapters of this tutorial, the following general characteristics hold true for any WSX-based website:- from a functional perspective, a WSX-based website can be regarded as a browsable repository of content, with said content being made available in a web browser via a consistent visual interface that features a predetermined set of functionalities that are provided by the WSX template, e.g. a standardized multi-lingual content organization, a standardized set of browsing functions, a website-wide search function, etc
- the WSX template provides a predefined set of formatting options for the documents contained in a WSX website, such that all said documents can easily be authored and presented in a visually consistent way
- a WSX-based website consists exclusively
of static content, i.e. the server on
which a WSX website is hosted does not have to provide any server-side
scripting, nor any form of data base management and/or code execution
capabilities
Content
organization on a WSX website
The language
sections of a WSX website
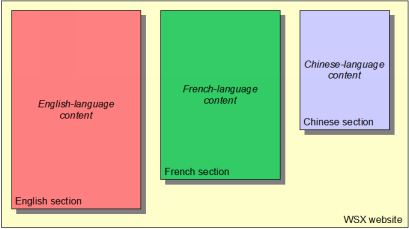
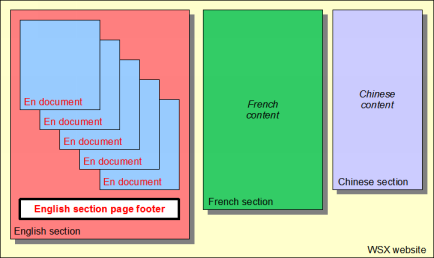
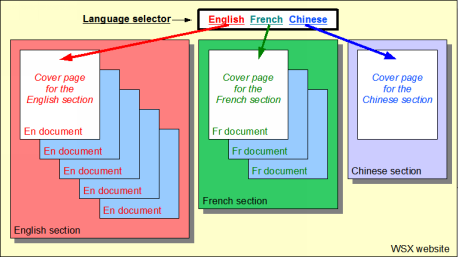
The WSX template provides a
framework for organizing the content of a WSX-based website into one or more 'language sections', where each such section should
contain an autonomous version of the
website authored in one given language; this is exemplified in
Fig.@count@images#wsx_logical@ below:
- note: there
is no intrinsic requirement to have the content of a WSX-based website
organized in the same way for each of the available languages,
e.g. a company website may well contain multiple pages in the english
section (e.g. a "company profile" page, a "products and services" page,
a "contact information" page, etc) while only containing a single page
(e.g. a "company overview" page) in the chineze section; additionally,
a WSX-based website can
contain only one language section (e.g. it can be an english
language-only website), in which case the very notion of 'multi-lingual
content' becomes irrelevant.
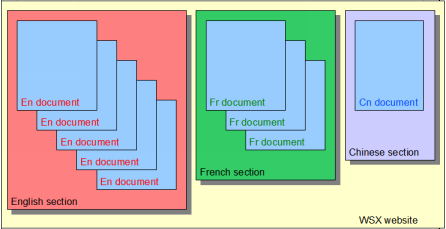
The WSX documents
Most of the contents of a WSX-based website is meant to be published as [specially-crafted] HTML documents, with said documents logically residing in one of the website's language sections (depending on the language in which each document is authored). We will here-forth refer to the HTML documents contained in a WSX-based website as 'WSX documents'.- note: the WSX documents are in fact standard HTML documents, but with
the special note that they include a common hidden header that allows them to
be integrated into a WSX-based website. Despite the hidden header
requirement imposed on the HTML documents, the process of creating a
new WSX document is straight-forward and requires no HTML coding, and
it will be detailed later in this tutorial.
- note: although the intended
role of the WSX language sections is to "cluster together"
documents that are written in one given language, the WSX template does not enforce this provision in
any way. However, in order to preserve the logical coherency of a
WSX-based website, it is recommended to have each document contained in
a WSX website authored in such a way as to allow it to be naturally placed in one of the
language sections of the website.
For example, consider a WSX document that presents a certain product and which is written in french, but said document also includes an english-language data sheet; in this case, said document can still be logically thought of as a french-language document, and it can thus be naturally integrated in the french-language section of the website:
Fig.@count@images:wsx_multilingual_doc@: French-language document containing an embedded english-language data sheet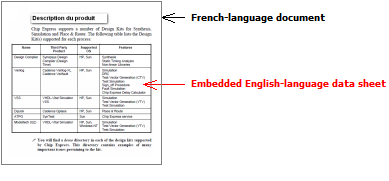
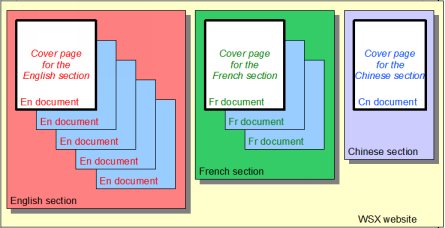
Cover pages
A mandatory condition for each of the language sections of a WSX website is to be organized in such a way that one of its documents serves the role of a "entry page" for that language content: we will refer to these special-purpose documents as the 'WSX cover pages', or simply the 'cover pages', of the language sections of the website. The cover page document of a language section does not (have to) have any special structure, e.g. to be organized as a "main menu" containing links to the other pages in the website, etc; instead, the cover page of a language section only has an intended role of acting as a "welcome page" for the content published in that language, e.g. where a (brief) introduction to the website can be presented in the corresponding language.- note: at the current stage of this presentation, the requirement
for each language section to contain a document designated as its cover
page may look as an un-necessary condition, especially since it was
explicitly stated that the cover page documents do not need
to be structurally different from any other WSX document;
however, the
existence of a 'cover page' for each language section of a WSX-based
website is a key organizational condition upon which the WSX template's
browsing facilities are built (this condition is explained later
in this tutorial)
The WSX home page
The WSX template imposes a specific restriction as to which of its internal documents can be designated as the website's home page; specifically, the home page of a WSX website must always be one of the website's cover pages.- note: the concrete method for specifying the home page of a WSX
website will be presented later in this tutorial
The WSX data files
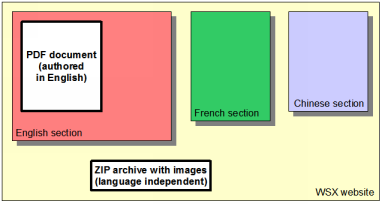
Apart from containing WSX documents, a WSX-based website can also include other types of files which are not HTML documents, e.g. PDF files, zip archives, flash animations, stand-alone images, etc; we will here-forth refer to these files as the 'WSX data files', or simply the 'data files' contained in a WSX website. The most important characteristic that differentiates the WSX data files from the WSX documents is that a data file is not required to logically reside inside one of the language sections of a WSX website, i.e. the logical position of a data file within the internal structure of a WSX website can be either inside one of the language sections, or outside any-and-all of the language sections.For example, consider the situation where a PDF document is authored in english and should thus be logically placed inside the english-language section of the website, while a ZIP archive file contains a collection of landscape images that are not related to any specific language and should thus be logically positioned outside all of the language sections of the website; this is illustrated in Fig.@count@images#wsx_data_files@ below:
- note: the presence of data files is not mandatory on a WSX website, e.g. a website may contain no data files at all, or it may contain data file(s) only in some of its language sections, etc
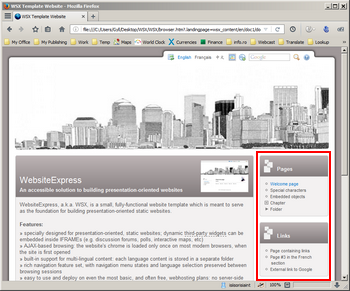
The user interface of a WSX website
The WSX display
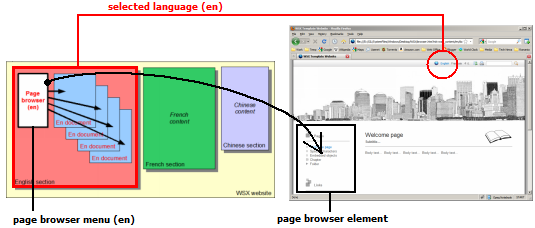
We'll use the term 'WSX display' to refer to the visual representation of a WSX website in a web browser window. Specifically, the WSX documents contained in a WSX website are always displayed one document at a time in a browser window, with said document being displayed together with various other website components (e.g. navigation menus, emblems, controls, etc) as "embedded items" inside the WSX display; this is illustrated in the annotated screenshot in Fig.@count@images#wsx_display@ below, where the red-colored frame highlights the WSX display area: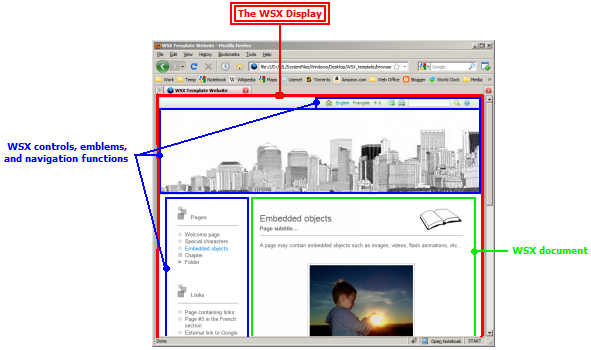
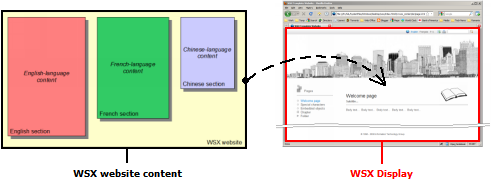
In other words, the WSX display acts as a "canvas" on which a WSX website's content is made available in a web browser window; the relationship between the content of a WSX website and the WSX display can be graphically illustrated as in Fig.@count@images#wsx_display_function@ below:
The layout elements of the WSX display
In order to simultaneously accommodate a WSX document together with
various other website components as "embedded items" in a single
browser window, the graphical layout of the WSX display is divided into
several graphical parcels as
illustrated in Fig.@count@images#wsx_layout@ below, with each of these
parcels serving a specific role (e.g. the 'document viewer' parcel acts
as a "viewport" through which a given WSX document is effectively
displayed in the web browser, the 'page browser' parcel exposes a page
navigation menu that controls which WSX document is displayed in the
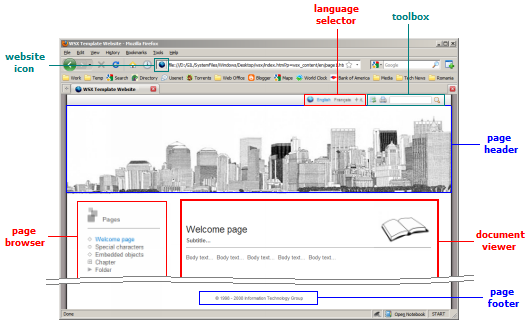
'document viewer', etc); we will refer to these graphical parcels as the 'layout elements' of the WSX display.The annotated screenshot in Fig.@count@images#wsx_layout@ below presents an overview of the layout elements of a typical WSX website:
- note: when designing a new WSX-based website, the WSX template
allows the graphical appearance of the WSX display to be customized to
a certain extent, e.g. to hide the page navigation menu, or to hide the
page header, etc (this is achieved by means of several 'WSX configuration files' which
will be discussed in detail later in this tutorial); however, in any
customization scenario the 'document
viewer' element will always be visible on the WSX display as it
represents the exclusive
"viewport" through which the website's documents can ever be displayed to the reader
(i.e. without the presence of the 'document viewer' element on the WSX
display there would be no way of displaying the WSX documents in the
browser).
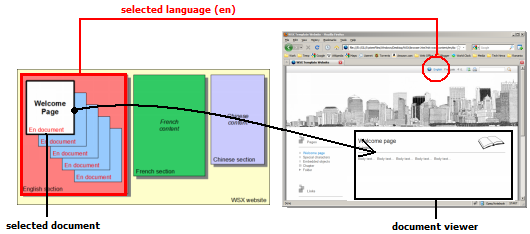
WSX states and selections
A very
important notion that will be used throughout this tutorial is
the 'WSX state':
a WSX state "encapsulates" two
correlated parameters which together describe the state of a
WSX-based website at a given moment; specifically:- we'll use the term 'selected document' to
represent the WSX document that is being displayed on the
WSX display at a given moment (i.e. inside the document viewer element)
- we'll use the term 'selected language' to represent the language section where the selected document resides (this should normally correspond to the language in which the selected document is written)
- note: a WSX state will be occasionally be represented throughout
this tutorial by using a curly braces notation: {selected_language,
selected_document}; for example, the notation {English, Document#1} will
represent the state of a WSX website when the selected language on the website is
'english', and the selected document
is 'Document#1' of the english-language section of website.
- the language selector element
displays the languages that are available on a WSX website, and highlights the "currently" selected
language
- the page browser element displays the documents that are available in the currently selected language, and highlights the document that is "currently" displayed in the document viewer
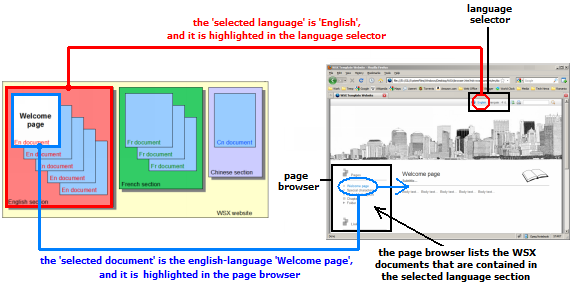
- note: the language selector element and the page browser element not only "reflect" the state of a WSX-based website at a given moment, but they can also be used to change the language selection on a WSX website and/or the document that is displayed on the WSX display, i.e. these layout elements also act as navigation elements on a WSX-based website; the functionality of these two elements will be detailed later in this tutorial.
The functional
components of a WSX website
In terms of internal logical organization, a WSX-based website has a modular design consisting of a collection of autonomous 'functional components' that each serves a specific role, and each functional component logically resides either inside one of the language sections of the website, or outside any of the language sections; this is schematically illustrated in Fig.@count@images#wsx_internal_generic@ below:
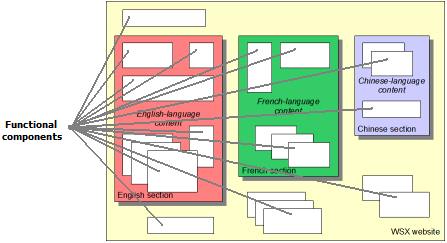
The functionality of a WSX functional component is determined by its type, i.e. each WSX functional component is of a certain type, and there can be one or more functional components of a given type residing on a WSX website. For example, given the schematic illustration in Fig.@count@images#wsx_internal_generic@ above, two obvious types of WSX functional components are the WSX documents and the WSX data files, with each of these two types of functional components serving the role of "encapsulating" a certain kind of information (i.e. the WSX documents encapsulate an HTML document, and the WSX data files encapsulate various non-HTML data).
A key property that is common to (almost) all of the WSX functional components is that they can be "reflected" on the WSX display, thus providing a way for them to be accessed and/or "controlled" from within a browser window; specifically, each type of functional component has a dedicated layout element where it can be displayed on the WSX display, and each layout element can only "reflect" one given type of WSX functional component. For example, the WSX documents (which, as previously explained, are functional components on a WSX website) are always displayed inside the 'document viewer' element on the WSX display; this is illustrated in Fig.@count@images#wsx_reflection@ below:
The following paragraphs in this chapter incrementally introduce all the individual functional components of a WSX-based website, and explain how, and in which conditions, these components are displayed inside the layout elements on the WSX display.
- note: throughout the remainder of this tutorial we will often use
the term 'component'
as short for '[internal]
functional component', and 'element' as
short for 'layout element'
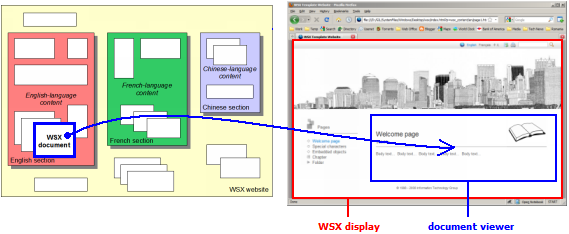
The WSX documents
As it was previously explained, the "logical position" of the WSX documents within the internal structure of a WSX website can be illustrated as in Fig.@count@images#wsx_docs2@ below: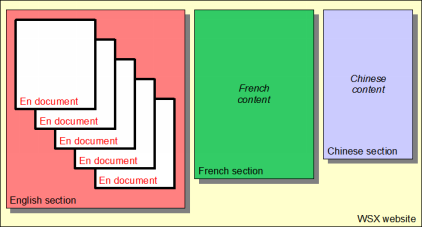
The visual interface of a WSX document on the WSX display is the 'document viewer' element which, at any given moment, displays the document that is "currently" selected on the website.
For example, if at a given moment the selected language on a WSX website is 'english' and the selected document is the [english-language] 'Welcome page' document, then the 'Welcome page' document will be displayed inside the document viewer element on the WSX display; this is illustrated in Fig.@count@images#wsx_docs_display@ below:
The WSX data files
As it was previously explained, the "logical position" of the WSX data files within the internal structure of a WSX website can be illustrated as in Fig.@count@images#wsx_data_files2@ below: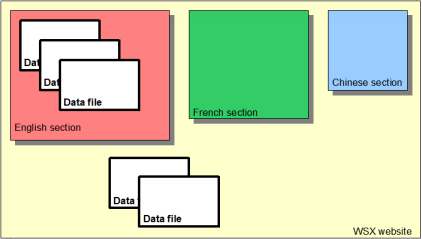
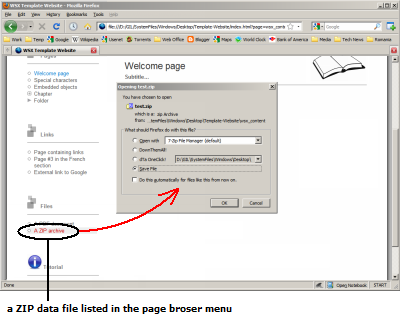
IMPORTANT: the WSX data files are an exception among the WSX functional components in terms of how they are displayed on a WSX website: specifically, whereas all the other functional components have a graphical representation on the WSX display, a data file is never displayed on the WSX display itself (as an embedded item); instead, when attempting to display a WSX data file, said data file is either displayed in a new browser window/tab if an appropriate plug-in is installed in the browser (e.g. a PDF reader plug-in will allow PDF files to be displayed by the browser in a new window/tab), or, if no appropriate plug-in is installed, then a "Save As..." pop-up dialog will be displayed by the browser allowing the data file to be saved on the computer (e.g. trying to open a ZIP archive will [typically] result in having the "Save As..." dialog displayed by the browser).
Fig.@count@images#wsx_data_file_open@ below illustrates the behavior of a WSX website when attempting to open a ZIP archive data file: specifically, the "Save As..." dialog is displayed by the web browser:
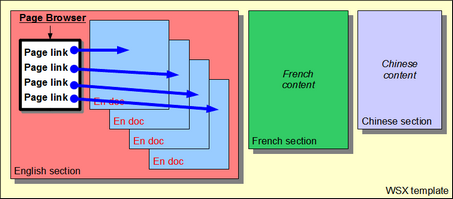
The page browser menus
A page browser menu is a functional
component of a WSX website that is displayed inside the page browser layout element on the WSX display,
and whose intended role is to
provide the "table of contents" for the documents contained in a given language section
of the website. In order to achieve this functionality, each language section of a WSX website has its
own associated page browser menu component, which should list
the documents contained in the corresponding language section.The "logical position" of the page browser menus within the internal structure of a WSX website is illustrated in Fig.@count@images#wsx_page_browser@ below:
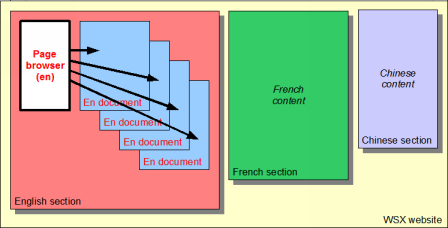
For example, if at a given moment the selected language on a WSX website is 'English', then the page browser menu displayed on the WSX display will be the one associated with the english section of the website:
- note: as a general recommendation, a page browser menu should
list all the documents
contained in its corresponding language section; however, this is not strictly necessary as log as all
the language section's pages are reachable in some other way (i.e. by
following some other links than the ones in the page browser itself).
As a simple example to illustrate this possibility, consider a
"multi-page document" which might consist of several web pages that are
linked with one-another by means of 'Next page' / 'Previous page' links
contained in each of the
document's pages: in this case it is possible (although not
generally recommended) to have only the first page of the "multi-page
document" listed in the page browser menu, while all the other pages of
the "multi-page document" could be reached starting from the first page
of the document by following the 'Next page' / 'Previous page' links
contained in each page of the document:
Fig.@count@images:wsx_page_browser_multipage@: A "multi-page document" may have only one page listed in the page browser menu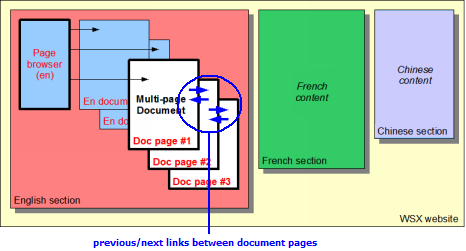
The page headers
A page header is a fuctional component of a WSX website that is displayed inside the page header layout element at the top of the WSX display, and it consists of a customizable image that may be either centered at the top of the WSX display or it may stretch on the entire width of the display.In order to provide an increased level of flexibility, the page header image displayed at the top of the WSX display can be different depending on which language is selected on the website at a given moment; this feature is achieved by having a separate page header image for each language section of a WSX website.
The "logical position" of the page header functional components within the internal structure of a WSX website is illustrated in Fig.@count@images#wsx_page_headers@ below:
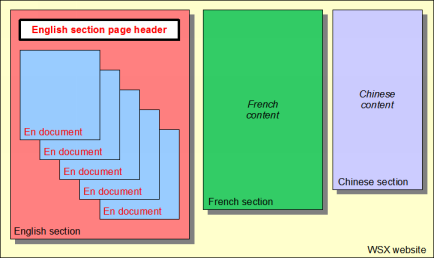
Out of all the individual page header components (i.e. one page header component for each language section of a WSX website) only one page header is displayed on the WSX display at any given moment, namely the page header of the "currently" selected language.
For example, if at a given moment the selected language in Fig.@count@images#wsx_page_headers_display@ below is 'English', then the page header component that is automatically displayed on the WSX display will be one associated with the english language section of the WSX website:
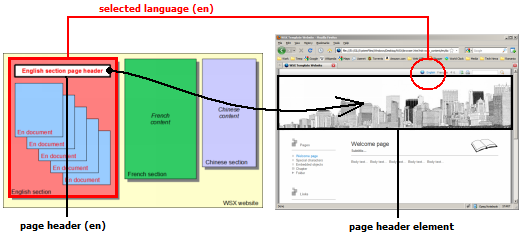
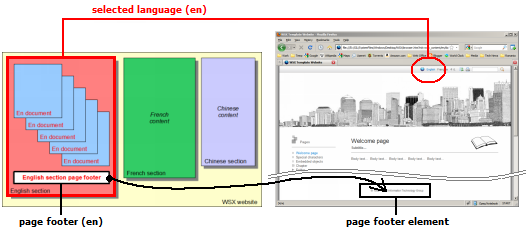
The page footers
A page footer is a functional component of a WSX website that is displayed inside the page footer layout element at the bottom of the WSX display, and it consists of a (simple) customizable HTML page that can contain a combination of text, images, and/or links, possibly arranged inside a table.In order to provide an increased level of flexibility, the page footer element on the WSX display can display a different content depending on which language is selected on the website at a given moment; this feature is achieved by having a separate page footer component for each language section of a WSX website.
The "logical position" of the page footers within the internal structure of a WSX website is illustrated in Fig. @count@images#wsx_page_footers@ below:
For example, if at a given moment the selected language in Fig.@count@images#wsx_page_footers_display@ below is 'English', then the pager footer component that is automatically displayed on the WSX display will be the one associated with the english language section of the WSX website:
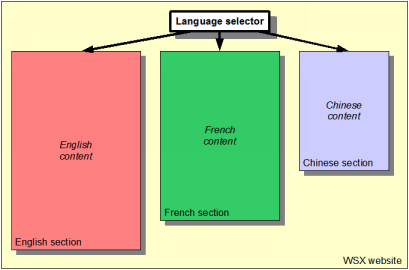
The language selector
The language selector is a functional component of
a WSX website that is displayed on the WSX display, and it provides a
means to change the language selection
on a WSX website.The "logical position" of the language selector component within the internal structure of a WSX website is illustrated in Fig.@count@images#wsx_lang_selector@ below:
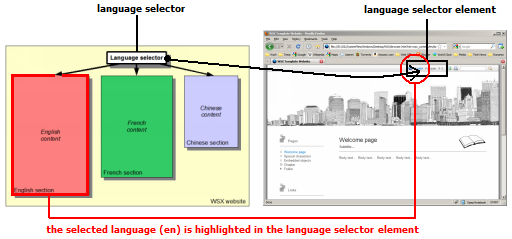
The visual interface (on the WSX display) for the language selector component is the language selector element, and at any given moment it highlights the "currently" selected language on the website.
For example, if at a given moment the selected language on the website is 'English', then the language selector displayed on the WSX display will highlight the 'English' item (i.e. the "currently" selected language):
The website icon
The website icon is a functional component of a WSX website that consists of an icon-sized image which is displayed in the URL bar of the web browser, and whose intended role is to serve as a quick visual identifier for the entire website.The "logical position" of the website icon within the internal structure of a WSX website is illustrated in Fig.@count@images#wsx_icon@ below:
The toolbox
The website toolbox is a functional
component of a WSX website that allows the reader to perform
various website-wide operations,
e.g. to search through the WSX documents, to change the skin of the
website, to print and/or save the selected document, etc. The "logical position" of the website toolbox within the internal structure of a WSX website is illustrated in Fig.@count@images#wsx_toolbox@ below:
The full picture
The preceding paragraphs of this chapter have incrementally introduced the internal functional components of a WSX website, and explained how and when these components "get reflected" into the layout elements of the WSX display; a quick reference diagram of the internal structure of a generic three-language WSX website is summarized in Fig.@count@images#wsx_internal@ below:
The file structure of a WSX
website
The file structure of a generic WSX-based website is well illustrated by the file structure of the WSX template which, as it was briefly mentioned at the beginning of this tutorial, effectively consists of a small, fully functional website that has been specifically designed to illustrate (almost) all of the functionality that can be included in a WSX-based website. In this context, Fig.@count@images#wsx_template_internal@ below summarizes the functional components included in the WSX template, together with the way they are organized into the three language sections (namely english, french, and chinese):
The root folder
In terms of internal implementation, the entire file structure of a WSX-based website is contained inside the website's root folder which, in turn, is composed of two major groups of files and folders; specifically:- a group of non-customizable
files and folders that collectively reside directly inside the WSX root
folder, and which together constitute the
"backbone" of the website; this "backbone" group of files and
folders is provided by the WSX template, and it must be part of (read:
inherited by) any
WSX-based website
- a group of customizable files
and folders that represent the WSX template's functional components, and which all
reside inside the 'wsx_content' sub-folder of the WSX root folder

The 'wsx_content' folder
The 'wsx_content' folder is the containing folder for all the content of a WSX-based website, and its file and sub-folder structure closely mirrors the logical organization of a WSX website.An illustrative example of the correspondence between the logical organization and the file structure of a WSX-based website is offered by the WSX template, where:
- each language section of the WSX template is represented by a dedicated language sub-folder
contained inside the 'wsx_content' folder; this is illustrated in
Fig.@count@images#wsx_template_langs@ below, where the 'en', 'fr', and
'cn' folders respectively represent the english, french, and chinese
language sections:
Fig.@count@images:wsx_template_langs@: Each language section is represented by a dedicated sub-folder inside the 'wsx_content' folder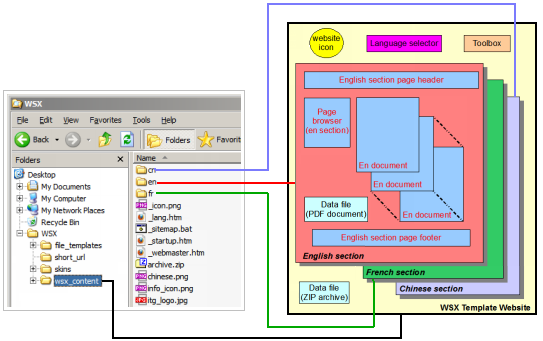
- each WSX functional component that logically resides outside the
WSX template's language sections is represented by a dedicated file placed directly
inside the 'wsx_content' folder (i.e. outside any of the
language sub-folders); this is illustrated in
Fig.@count@images#wsx_template_external@ below where the website icon, the language selector, and the
'archive.zip' data file are each
represented by a corresponding file inside the 'wsx_content'
folder:
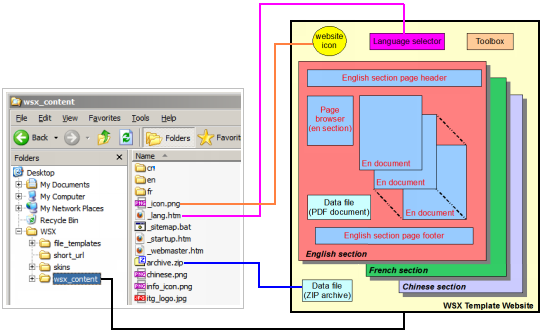 Fig.@count@images:wsx_template_external@: Each functional component that is not part of a language section is represented by a dedicated file located inside the 'wsx_content' folder
- each WSX functional component that logically resides inside one
of the WSX template's language sections is represented by a dedicated file placed inside
the corresponding language sub-folder of the 'wsx_content'
folder; this is exemplified in
Fig.@count@images#wsx_template_internal_fr@ below which illustrates the
file structure of the 'fr' french-lanaguge folder of the WSX template:
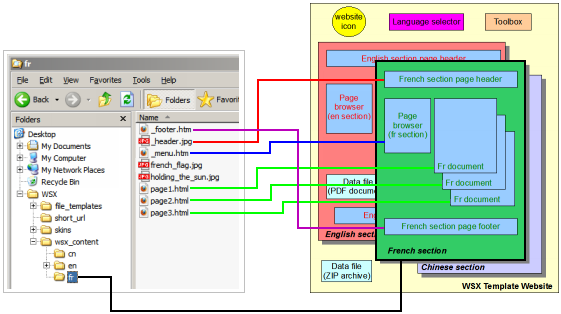 Fig.@count@images:wsx_template_internal_fr@: Each functional component that is part of a given language section is represented by a dedicated file located inside the corresponding language folder
Apart from the file-structure characteristics described above, the WSX template also establishes several naming conventions for the constituent files and folders of a WSX-based website, specifically:
- all the files and folders that represent the various WSX functional components except the WSX documents and the WSX data files have predefined names (i.e. these names must be used on any WSX-based website) and they all start with an underscore '_' character; this naming convention can be observed in the diagrams above where e.g. the website icon file is named '_icon.png', the language selector file is named '_lang.htm', the footer file of the french language section is named '_footer.htm', etc
- all the WSX documents and WSX data files, as well as the language folders, can have arbitrarily names, but with the explicit restriction that the file extension of the WSX documents must be '.html' (note that although the '.html' and '.htm' file extensions both designate HTML file types, the file extension '.htm' is not allowed for the WSX documents)
The control elements of a WSX website
The WSX hyperlinks
We will use the term 'WSX hyperlinks' (or 'WSX links') to refer to any HTML hyperlink-like reference that is used throughout the file structure of a WSX-based website; specifically, WSX hyperlinks can appear inside WSX documents, and, as it will be shown later in this tutorial, inside the various WSX control files that together determine the behavior of a WSX website. The WSX hyperlinks form the basis for all the navigation functions of a WSX-based website, i.e. all the "clickable items" on a WSX-based website, whether they are contained in a WSX document, or in a page browser menu, or in a page footer, etc, are implemented as WSX hyperlinks.
Internet links
We will use the term 'Internet link'
for any WSX link which references an
address that is located on the internet. All internet links on a
WSX website are always opened in a
new browser window/tab.
- for example, the string "http://google.com" (without the quotes) is an Internet link that references the Google.com website
WSX local links
We will use the term 'WSX local
links' for any WSX link which
references a file that is part of the WSX website where the link resides;
in this context, the WSX template defines two types of WSX local links,
namely "WSX absolute links" and "WSX relative links";
these two types of WSX local links are presented in the following
paragraphs.
WSX absolute links
As it has been previously explained, the entire content of a WSX-based website is contained inside the 'wsx_content' folder of the WSX website; in this context, a 'WSX absolute link' is a reference to a file that is part of a WSX website and which specifies the target file by means of its full path after the 'wsx_content' folder.
In terms of syntax, a WSX absolute link always starts with a '/' character.
For example, the link '/en/document.pdf'
(without the quotes) placed in a WSX document that is part of the WSX
template is a WSX absolute link that references the file
'document.pdf' contained in the english-language section of the WSX
template, i.e. the full path of the file inside the WSX template's root
folder is:
'wsx_content/en/document.pdf':

WSX relative links
The WSX relative links are references to files that are part of a
WSX-based website and which
use the standard
notation for relative paths to files, e.g.:
- relative link to a target file contained in
the same folder as the current file: target-file
- relative link to a target file contained in a sub-folder of the current file's folder: sub-folder/target-file
- relative link to a target file contained in
the parent folder of the current file's folder: ../target-file
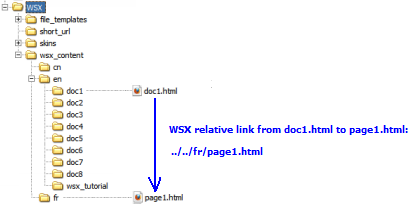
For example, consider that a link should be placed in the
english-language document 'en/doc1/doc1.html' of the WSX template such
that it points to the french-language document 'fr/page1.html' of the
WSX template; then, if using a WSX relative link, the link's sytnax
should be: "../../fr/page1.html" (i.e. the
leading '../' points to the 'en' folder, then '../../' points to the
'wsx_content' folder, then '../../fr' points to the 'fr' sub-folder of
the 'wsx_content' folder, and
finally '../../fr/page1.html' points to the intended document):
The behavior of the WSX local
links
The WSX local links have a complex behavior, which is different from
the
typical behavior of an HTML hyperlink; specifically:
- if a WSX local link points to a document other than a WSX document, then
said document will always be opened
in a new browser window/tab
- alternatively, if a WSX local link points to a WSX document, then:
- if the WSX local link's target is specified to be a new browser window/tab, then
clicking said link will open the corresponding WSX document in a new
window/tab and the page
browser element will not be
displayed inside the new browser
window/tab (i.e. the WSX document will
occupy the full width of the WSX display
in the newly opened browser window/tab)
- alternatively, if the WSX local link's target is not specified as being a new browser window/tab, then:
- when said WSX local link is clicked, the corresponding WSX document is displayed on the WSX display inside the document viewer element, and said WSX document becomes the selected document, then
- the selected language on the WSX website is automatically updated according to the language section where the newly opened document resides, and
- finally, if the newly opened document exists [as a listed
item] in the page browser menu then it will be highlighted in the page
browser menu; else, if the newly
opened document is not listed as an item (read: does not have an entry)
in the page browser menu then the page browser element is removed from
the WSX display, i.e. the document will occupy the entire width of the
WSX display
- note: the target of a WSX local link is specified differently
depending on the location of said local link. For example, a WSX local
link contained inside a WSX document
specifies that its
target is a new browser window/tab by setting its "target=_blank"
attribute; alternatively, a WSX local link contained inside a page browser menu specifies that
its target is a new browser window/tab by being preceded by a '^"
character (this latter syntax is discussed in detail in "The
WSX control files" paragraph later in this tutorial); etc
Example 1
The image in Fig.@count@images#wsx_links_corss_section@ below
illustrates the WSX template and the logical position of a WSX local
link which is located in the WSX template's french-language
'Page#2' and which points to the
'Welcome page' of the WSX template's english-language section (i.e. the
WSX local link crosses the
boundaries of the WSX
template's language sections):
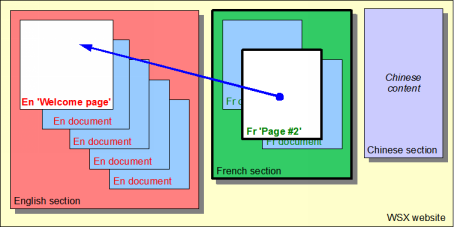
(from a french section document to an english section document)
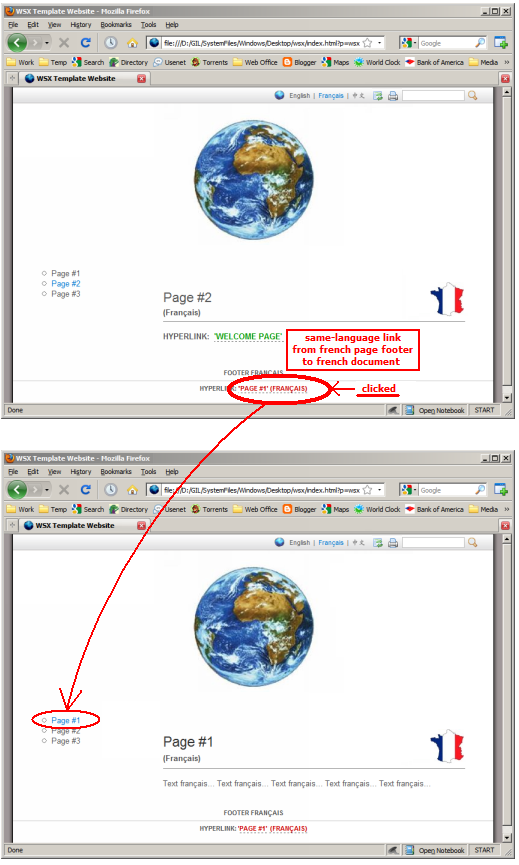
Given the above, the way in which the link illustrated in Fig.@count@images#wsx_links_corss_section@ above is reflected on the WSX template's display, together with the effect of clicking this link, are illustrated in Fig.@count@images#wsx_links_corss_section_click@ below:

and changes the language selection on the website
- The green-text link to 'WELCOME PAGE (ENGLISH)' in the french language "Page #2" in Fig.@count@images#wsx_links_corss_section_click@ above is a WSX local link that "crosses the boundaries" of the WSX template's language sections; specifically, the link itself resides in french-language section's document 'Page #2', but it "points to" the english-language section's 'Welcome page' document
- The effect of clicking the green-text link 'WELCOME PAGE (ENGLISH)' highlighted in Fig.@count@images#wsx_links_corss_section_click@ above is to both display the english-language "Welcome page' document inside the document viwer element, and also to change the WSX template's state from {French, Page #2} to {English, Welcome page} and update all the WSX display elements according to the new language selection
Example 2
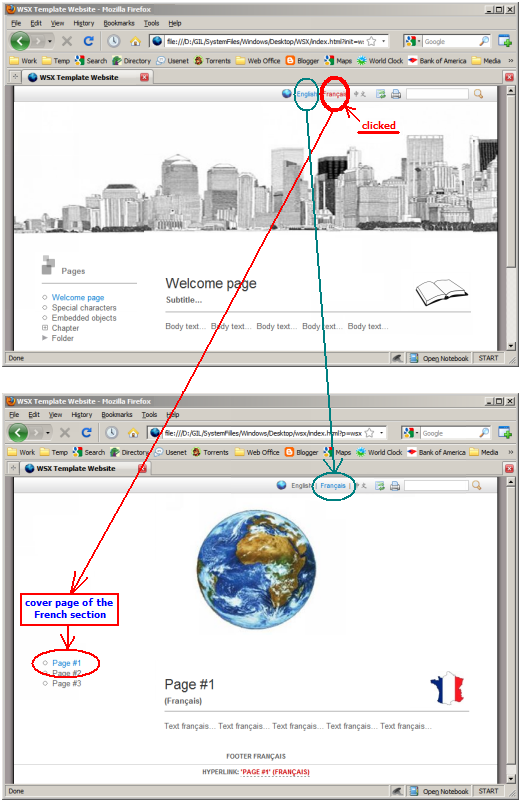
The image in Fig.@count@images#wsx_links_same_section@ below illustrates the WSX template and the logical position of a WSX local link which is located on the WSX template's french-language page footer and which points to "Page #1" of the french-language section (i.e. the WSX local link is confined within the boundaries of the same language section of the WSX template):
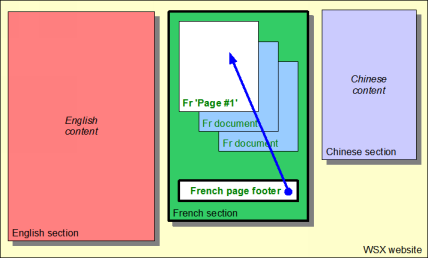
(from the french section's page footer to a french section document)
Given the above, the way in which the link illustrated in Fig.@count@images#wsx_links_same_section@ above is reflected on the WSX template's display, together with the effect of clicking this link, are illustrated in Fig.@count@images#wsx_links_same_section_click@ below:
and leaves the language selection unchanged
- The red-text link to 'PAGE #1 (FRANÇAIS)' displayed in the page footer element of the WSX template's french section in Fig.@count@images#wsx_links_same_section_click@ above is a WSX local link that is "confined within the boundaries" of one language section; specifically, the link itself resides in the french-language section's page footer, and it "points to" the french-language section's 'Page #1' document
- The effect of clicking the red-text link 'PAGE #1 (FRANÇAIS)' highlighted in
Fig.@count@images#wsx_links_same_section_click@ above is to change the
document that is displayed inside the document viewer element, but without changing the language selection
on the WSX website
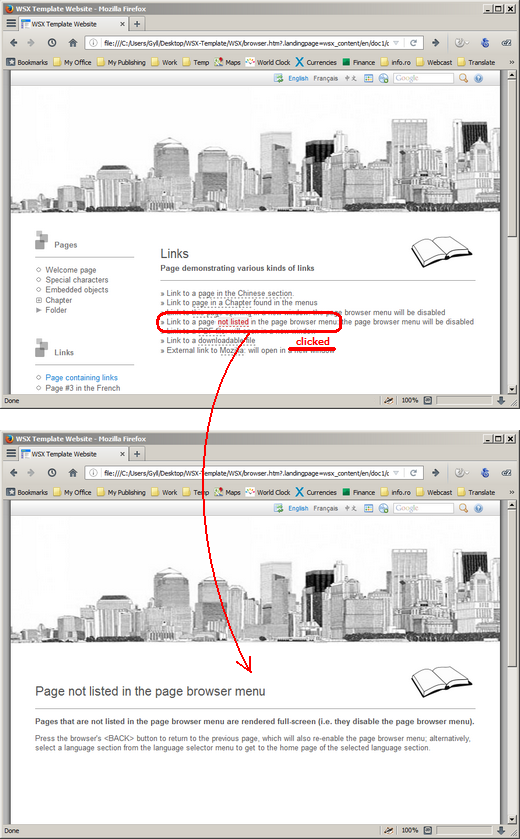
Example 3
Fig.@count@images#doc-not-in-menu@ below illustrates the behavior of a link to a WSX document which is not listed in the page browser menu and which is to be opened in the current window:
The implementation of the
language selector
As it was previously described, the language
selector component is a functional component that provides a means
to change the selected language
on a
WSX website. More specifically, the implementation of the language
selector
component contains a set of WSX
local links which each point to one of the cover
pages of the WSX website. For example, the implementation of the language selector component on the WSX template contains a set of WSX local links to the cover pages of the WSX template; this is illustrated in Fig.@count@images#wsx_lang_selector_internal@ below:
contains a set of WSX local links to the template's cover pages
- "opening" the corresponding cover page document in the document viewer element, and
- automatically updating the language selection on the website to the language of the newly-opened cover page
The role of the WSX cover pages
At this point in this presentation, the role of the WSX cover pages as "local home pages" for each language section of a WSX website should become evident: specifically, each time the language is changed by using the language selector element (i.e. by clicking on one of the language selector's links), the document that will be automatically "opened" on the WSX display (i.e. in the document viewer element) will always be the cover page of the newly-selected language section.- note: an alternative (and probably more intuitive) behavior of a
WSX website
when changing the language selection would have been to simply
re-display the document shown in the document viewer in the newly
selected language; however, this behavior cannot be implemented because
the WSX template explicitly
allows
the contents of a WSX website to be organized
differently for each of the available languages, i.e. the
contents of the language sections can consist of totally different sets of documents,
such that there is no guarantee that a document that is displayed at a
given moment in a given language is also available (as a translation)
in another language.
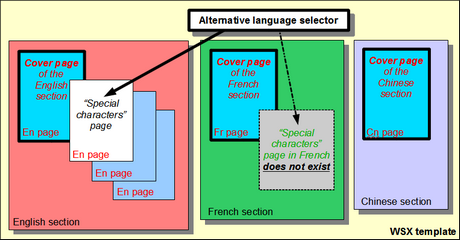
For example, the WSX template's language sections each contains a completely unrelated set of documents; in this case, if at a given moment the WSX template displays e.g. the english-language "Special characters" document in its document viewer element and then the language selection is changed to french, it is impossible to display the "Special characters" page in french because no such document exists in the french-language section of the WSX template (see Fig.@count@images#wsx_lang_alt@ below):
In conclusion, the choice to always display a language section's cover page whenever the language selection is changed on a WSX website provides a consistent behavior across the entire website, while minimizing the restrictions as to how the website's multi-lingual content has to be organized.
The implementation of
the page browser menus
As it was previously described, a page
browser menu component is
a functional component of a WSX website that is intended to provide a
"table of contents" for a given
language section of the website. In terms of
implementation, each page browser menu component contains
of a collection of WSX local links that "point" to all, or part, of the
documents contained in its corresponding language section.For example, the WSX local links contained in the WSX template's english-language page browser menu can be illustrated as in Fig.@count@images#wsx_page_browser_internal@ below:
consists of a WSX local link to a WSX document
Cross-language menu entries
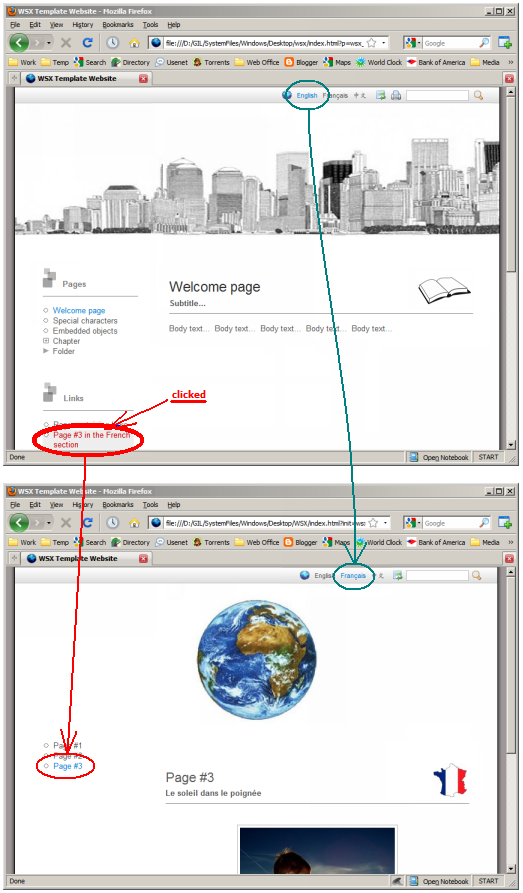
Although the intended usage of a page browser menu is to contain links that point to documents in its corresponding language section, links to documents that belong to a different language section are also allowed.For example, the WSX template's english-language menu entry "Page #3 in the French section" points to the french-language section document "Page #3"; this is illustrated in Fig.@count@images#wsx_page_browser_cross_section@ below:
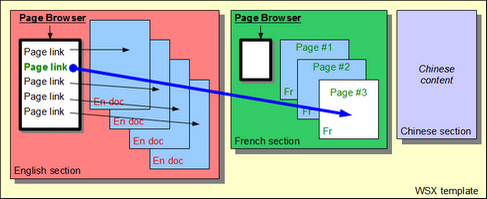
As it was previously explained, if any WSX local link on a WSX website "crosses the boundary" of a language section, then clicking said link will not only display the "target" document inside the document viewer element, but also change the language selection on the website according to the language section where the link "points to"; thus, given the fact that the english-language section's page browser menu entry "Page #3 in the French section" points to the french-language section document "Page #3", the effect of clicking said menu entry is to both display the "Page #3" document in the document viewer element on the WSX display, and also to automatically change the language selection on the WSX template to french; this is illustrated in Fig.@count@images#wsx_page_browser_cross_section_click@ below:
Anchors
Standard HTML anchors (and references to anchors, i.e. #anchor) can be used inside WSX documents.
The WSX control files
As it has been previously explained, a WSX-based website can be
regarded as a collection of functional
components that each serves a specific role; in this context, the WSX control files
determine the
appearance and/or functionality of each individual
functional component of a
WSX-based website.
There are three important characteristics that together can help to
easily identify the WSX control files within the file structure of a
WSX
website, namely:
- the WSX control files are either HTML files which can be directly viewed in a web browser and edited in an HTML editor, or image files which can be viewed and edited in an image editor
- the HTML control files all have the extension '.htm' (and not '.html')
- the image-type control files have the extension '.png' or '.jpg'
- all the WSX control files have predefined names that start with one underscore character '_'
- all the WSX control files are located either directly inside the website's 'wsx_content' folder, or directly inside one of the
website's language
sections sub-folders, depending on whether a given control file
corresponds to a website-wide
or to a language section-specific
control item
- for example, in the case of the WSX template website, the website icon is a website-wide functional component (i.e. it is displayed regardless of the language selection on the WSX template), and its corresponding WSX control file is an image file named '_icon.png' located directly inside the 'wsx_content' folder
- alternatively, the
english-language page header of the
WSX template (i.e. the
page header image that is displayed when
the english language is selected on the WSX template) is
represented
by an image file named '_header.jpg',
which is located in the corresponding language-section sub-folder
'en' of the WSX template
Fig.@count@images#control-files-position@ below summarizes the position of the WSX control files within the file structure of the WSX template:
Fig.@count@images:control-files-position@: The location of the WSX control files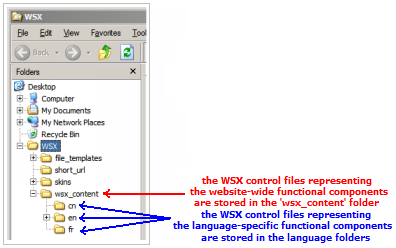
within the file structure of the WSX template
General syntax of the HTML control files
In terms of internal syntax, an HTML control file consists of one or more sections enclosed in {} characters:
{section_data}
{section_data}
{section_data}
The data in each
section is grouped into control items enclosed in ()
characters, with each such control item consisting of one or more control
fields separated by a separator character:
{(control_field)
 (control_field^control_field)
 (control_field!control_field|control_field)
}
- note: there are several separator characters that can be used inside a control file, each with a specific meaning/role (in the example above, the separator characters are ^ , | , !). The meaning/role of each separator character, together with the ways in which it can be used, will be explained later in this chapter
{(control_field)
 [(control_field|control_field)
  (control_field)
  (control_field|control_field|control_field)
 ]
}
Comment blocks are allowed anywhere
between two control items, or between two sections, and they
consist of an arbitrary string of
text enclosed between two comment markers:"*this is a comment between sections
and it spans over two lines*"
{(control_field)
(control_field|control_field) "*this is a omment between two control items*"
(control_field|control_field|control_field)
}
- note 1: comment blocks cannot
be placed inside a control item, e.g the line below contains an
illegally-positioned comment:
(control_field|"*illegal comment*" control_field) - note 2: apart from the explicitly-designated comment blocks (i.e. the text strings enclosed between comment markers), "loose" text strings can also be placed anywhere between sections or between control items, but said text strings are restricted to not containing special characters that might be interpreted as syntactical elements in the file (e.g. {} () [] | ^ " * etc.)
- note 3: because the comment blocks can contain any arbitrary text
string (except comment markers),
the comment markers can be used to (temporarily) comment out portions
of a control file (e.g. for debugging purposes, etc), e.g.:
{(control_field)
"* (control_field|control_field) <-- this control item is commented out *"
(control_field|control_field|control_field)
}
The following sections in this paragraph present each functional
component included in the WSX template, and describe the details of how
each WSX control file determines the functionality of its corresponding
functional component.
IMPORTANT: understanding
the role and syntax of each of the WSX control files included in the
WSX template is critical to understanding the overall functioning of
the WSX template, which in turn is the most important prerequisite for
building a WSX-based website.
The website icon file
The website icon file of a WSX website is an image file with the predefined name
'_icon.png'
used to represent the website icon;
specifically:
- the recommended size of the image contained in the '_icon.png' file is 32x32 pixels
- it is recommended to use a transparent background for the website icon image
- because the website icon is a functional component that is unique to the entire WSX website, the position of this file is directly inside the 'wsx_content' folder
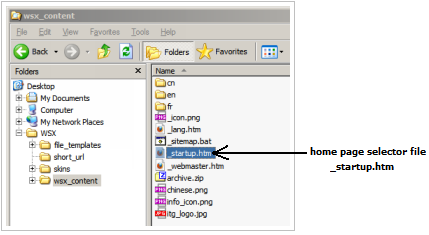
The home page selector file
The home page selector file of a WSX website specifies the website's
home page, i.e. which WSX
document will be displayed when the website is first opened in a
browsing session, and:
- the home page selector consists of an HTML file with the predefined name '_starup.htm', and it contains a reference to
the WSX website's home page
- as it has been previously described, the
home page of a WSX-based website must be one of the cover pages of
the WSX website
- because the home page selector is a functional component that is unique to the entire WSX website, the position of this file is directly inside the 'wsx_content' folder
Syntax
The syntax of a WSX website's home page selector file is well illustrated by the WSX template's '_starup.htm' file (show in Fig.@count@images#ctrl_startup@ above), and it consists of a WSX absolute link to the website's home page (enclosed as a single section with a single control item); specifically:{(/en/doc1/doc1.html)}
where the string "/en/doc1/doc1.html" is the WSX
absolue link to the WSX template's home page (i.e. to the
english-language document titled "Welcome page", which is also the
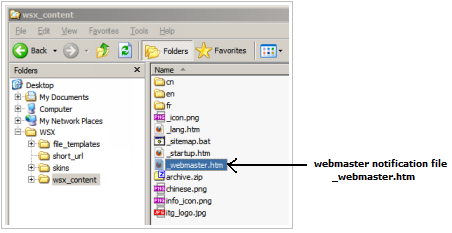
cover page of the english-language section).The webmaster notification file
The webmaster notification file is a standard HTML file that gets
displayed in a web browser when a WSX website encounters certain kinds
of configuration errors from which it cannot gracefully recover; the
intended purpose of the webmaster notification file is to display the
email address where the
website's webmaster can be contacted in order to report the encountered
problem.
- for example, if a WSX website contains a missconfiguration which specifies a non-existent home page, then the website will not be able to recover and the webmaster notification page will be displayed in the web browser.
The website notification file has the predefined name '_webmaster.htm' and, because a possible website misconfiguration is a website-wide problem, this file is located directly inside the 'wsx_content' folder.
For example, the
location of the webmaster notification file '_webmaster.htm' of the WSX
template is
illustrated in Fig.@count@images#ctrl_wm@ below:
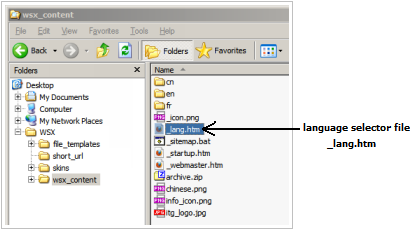
The language selector file
As it has been previously described, the language selector functional component
provides a means for changing the "currently" selected language on a
WSX website; specifically:
- the language selector component's representation is a single HTML
file
with the predefined name '_lang.htm', and it contains a set of references to the cover pages of each language section of
the website
- because the language selector is a functional component that is
unique to the entire website, the position of this file is directly
inside the 'wsx_content' folder
Syntax
The syntax of the language selector file is well illustrated by the WSX template's '_lang.htm' file (shown in Fig.@count@images#ctrl_lang@ above); specifically:1 {(WSX Template Website|a<bcde^fg^<hi>jkl~m)where:
2 (/en/doc1/doc1.html|English)
3 (/fr/page1.html|Français)
4 (/cn/custom_doc.html|chinese.png|Customized website title for the Chinese section)
5 }
- all the relevant data in the language selector file is enclosed
in a single section
- the first control item in the
language selector file (i.e. line 1 above) determines the website title and the choice of skins that the website can use:
- the first control field "WSX
Template Website" represents the website title as it appears in the a
browser title bar
- the second control field "a<bcde^fg^<hi>jkl~m" represents the available skins that can be used by the website: the WSX template skins are single-letter identifiers, and each skin identifier can be preceded by one or more "control characters" which can tweak seveal skin options; these control characters are discussed in the "Skin options" paragraph later in this tutorial
- there must be at least one
skin in a website's skin list, and a skin letter can appear only once
in the skin list
- the current implementation of the WSX template offers 13 skins, labeled from 'a' to 'm'
- the remaining control items (i.e. lines 2...4 above) are references to the cover pages of each of the language sections available on the website (e.g., in the case of the WSX template website, said references will point to the cover pages of WSX template's english section, french section, and chinese section), and they contain several control fields as follows:
- the first control field,
i.e. the string "/en/doc1/doc1.html" and similar, represent WSX-absolute links to each of the language
sections' cover pages
- the second control field, i.e. the
strings "English", "Français", and "chinese.png" indicate the section
names as they will be displayed in the language
selector element:
- the language selector element can display either a text string (as is the case with "English" and "Français" strings on the WSX template) or it can display an image (as is the case with "chinese.png" for the chinese section)
- as it can be seen in the "Français" string, special
HTML-valid characters can be used (i.e. 'ç') for the language sections
text
- using an image instead of text can be useful for displaying e.g. country flags, or in case the character set for a given language cannot be not assumed to be available on a browser
- optionally, a third control field will modify the default website
title as it was defined in the first control item of this file; e.g. in
the case of the WSX template, whenever the "currently" selected
language will be chinese, the browser title bar will display the title
"Customized website title for the Chinese section" instead of the
default title "WSX Template Website"
Hiding the language selector and/or the skin selector
For websites that are published in a single language (i.e. the website
contains a single language
section), the WSX website's internal mechanisms will hide the
language selector menu if
the '_lang.htm' file contains no references to any language section
cover pages, and in this case the
website will always be opened on its home page according to its home page selector file '_startup.htm'.Similarly, if the skin options in the language selector file '_lang.htm' contains a single skin (with our without a modifier character) then the skin selector icon will not be displayed.
For example, by editing the WSX template's language selector file '_lang.htm' such as to eliminate all the references to the template's cover pages and leaving only one skin option, the language selector menu and the skin selector icon will no longer be displayed on the WSX display; this is illustrated below:
{(WSX Template Website|>a)}

Skin options
Several skin customization options can be specified for a WSX website without modifying the WSX template's internal skin definition files by placing a set of [one or more] cotrol characters in front of each skin letter in the language selector file, namely:- a '>' character (without the quotes) specifies that the page
browser menus will be placed on the right hand side of the WSX display,
instead of the left hand side which is the default position
- a '^' character (without the quotes) specifies that the page browser menus will use large fonts regarless of whether the skin specifies small of large fonts by default
- a '<' character (without the quotes) specifies that the language selector menu will be placed on the left hand side of the website's title bar, instead of the right hand side which is the default position
- a '~' character (without the quotes) specifies a single-column,
mobile-friendly
layout, wherein the page browser menu is placed above the document
viewer
- if the '~' is used with a skin then any other modifiers are
ignored for that skin
- using the '~' modifier is generally not sufficient to make a
skin mobile-friendly; instead, the site skin, and specifiaclly the
skin's styling images and "skin.css" styling file, will generally have
to be designed with larger icons and fonts (the site skin definitions are described in
detail in the appendix)
- note: the order in which
the control characters are placed before a skin leter is irrelevant
The page browser files
As it has been previously described, a page browser functional component provides a means for accessing the documents that are included in a given language section of a WSX website; specifically:- each language section contains its own page browser component
- each page browser component's representation is a single file with the predefined name '_menu.htm', and it contains a set of references to the documents contained in its corresponding language section
- because each page browser component is specific to one language section of a WSX website, the individual '_menu.htm' files (each representing the page browser component of one of the website's language sections) are located in their corresponding language section sub-folder
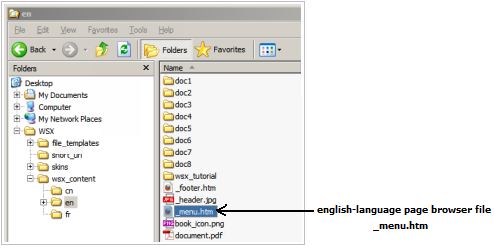
Syntax
The syntax of a page browser file is well illustrated by the WSX template's english-language page browser file '_menu.htm' (shown in Fig.@count@images#ctrl_browser@ above); specifically:- the file starts with a multi-line comment
block (enclosed in "*...*" delimiters) intended as a handy
reminder of a page browser file's syntax
- note: as it was previously explained, the horizontal lines
inside the page browser file do not have any functional role, and they
are only meant to graphically separate the file sections
- the next section in the page
browser specifies the content of the WSX template's Help pop-up (the
Help pop-up is displayed by clicking the Help icon in the WSX toolbox):

- the Help pop-up text is grouped as a single control item (i.e. all the text contained in this section is enclosed in a single group of () characters)
- in the specific case of the english-language page browser file of the WSX template, the Help pop-up section contains a description of the available toolbox controls
- the | delimiter character inside the Help pop-up text is
displayed as line breaks in the Help pop-up
- if the Help pop-up section of a page browser file is omitted, then the Help icon in the WSX toolbox is not displayed when the corresponding language is the "currently" selected language on the website (i.e. there will be no Help pop-up icon for a language section who's page browser file does not contain a Help pop-up section)
- for example, on the WSX template website only the
english-language page browser file contains a Help pop-up section, and
thus the Help icon will be displayed in the website toolbox only when
the the english language is selected
- the remaining sections in the page
browser file represent the successive page browser menu sections that
are displayed by the english-language page
browser menu:

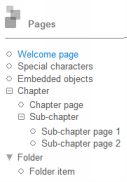
 1  {(Pages)
 2      (doc1/doc1.html|Welcome page)
 3      (doc5/doc5.html|Special characters|Right-click this link and select 'Open
                                           in new window' to see the HTML codes for
                                           the special characters [offline mode only])
 4      (doc7/doc7.html|Embedded objects|The objects embedded in a page may consist
                                         of images, videos, music players, etc)
 5      [(doc2/doc2.html|Chapter|A chapter can group pages, folders, or other chapters)
 6          (doc3/doc3.html|Chapter page)
 7         @[(doc8/doc8.html|Sub-chapter|Sub-chapter with automatically-linked pages)
 8              (doc8/doc8-1.html|Sub-chapter page 1)
 9              (doc8/doc8-2.html|Sub-chapter page 2)
10          ]
11      ]
12      [(|Folder|A folder can group pages, chapters, or other folders)
13         (doc4/doc4.html|Folder item)
14      ]
15  }
The above listing translates in the following layout for the first menu section displayed in the english-language page browser element (i.e. when the english language is selected on the WSX template):
Following is a one-by-one description of the various syntactical elements present in Listing @count@listings#page_browser_section@ above:
- the first control item (listed in the
first line in Listing
@count@listings#page_browser_section@ above) contains a single control field (namely the string "Pages"), and
it determines the title of the page browser menu section as it is displayed in the page browser menu
(i.e. "Pages" in Fig.@count@images#english_section_menu@ above)
(Pages) - the second control item (listed in
the second line in Listing
@count@listings#page_browser_section@ above) represents a reference
to the WSX template's english-language page titled "Welcome page", and
it contains two control fields:
(doc1/doc1.html|Welcome page)
- the first control field is the string "doc1/doc1.html", which is a WSX relative link to the 'doc1.html' file contained in the 'doc1' sub-folder of the english-language section folder (this document is the english-language page titled "Welcome page")
- the second control field is the string "Welcome page", which is
the page title as it is displayed in
the page browser menu (in this specific case, the page title
displayed in the page browser menu has been chosen the same as the
title shown on the page itself, i.e. "Welcome page")
- the third control item in Listing
@count@listings#page_browser_section@ above represents a reference
to the english-language page titled "Special characters", and it
contains three control fields:
(doc5/doc5.html|Special characters|Right-click this link and select 'Open
                                   in new window' to see the HTML codes for
the special characters [offline mode only]) - the first control field is the string "doc5/doc5.html" which is a WSX relative link to the 'doc5.htm' file contained in the 'doc5' sub-folder of the english-language section folder (this document is the english-language page titled "Special characters showcase")
- the second control field is the string "Special characters" which is the page title as it is displayed in the page browser menu (as it can be seen when clicking this link on the WSX template, the page title displayed in the page browser menu "Special characters" is different from the title shown on the page itself which is "Special characters showcase")
- the third control field is the string "Right-click this link
and select 'Open in new window' to see the HTML codes for the special
characters [offline mode only]", and it represents the tooltip that
appears when holding the mouse
pointer over the link in the page browser menu:

- IMPORTANT: tooltips
are not allowed to contain the characters '(' and ')' because the ')'
character is reserved as the end-of-tooltip delimiter
- the fourth control item in Listing
@count@listings#page_browser_section@ above contains a reference to
the english-language page titled "Embedded objects", and its syntax is
identical to the third control item described above (i.e. it contains a
WSX relative link to the 'doc7/doc7.html' document, followed by the
link title to be displayed in the page browser menu i.e. "Embedded
objects", and followed by the page browser menu tooltip "The objects
embedded in a page may consist of images, videos, music players, etc")
(doc7/doc7.html|Embedded objects|The objects embedded in a page may consist
of images, videos, music players, etc) - the following lines numbered
5...11 in Listing
@count@listings#page_browser_section@ above contain two nested control
blocks:
 5  [(doc2/doc2.html|Chapter|A chapter can group pages, folders, or other chapters)
 6      (doc3/doc3.html|Chapter page)
 7     @[(doc8/doc8.html|Sub-chapter|Sub-chapter with automatically-linked pages)
 8             (doc8/doc8-1.html|Sub-chapter page 1)
 9             (doc8/doc8-2.html|Sub-chapter page 2)
10      ]
11   ]
- each collection consists of one
or more pages, with the first page being the collection's "cover page", while the remaining
pages being consider to reside "inside"
the collection
- from a syntax point of view, the first control item of a
control block specifies the collection's "cover page" (e.g. the cover
page of the control block in the listing above is the document
'doc2/doc2.html' specified in line 5), while the remaining items inside
the control block specify the pages that are contained "inside" the
collection
As it can be seen in the listing above, a collection of items can contain not only individual pages (i.e. the 'doc3/doc3.html' page in line 6 above), but also other collections (i.e. lines 7...10 above), such that a hierarchy of collections can be created in a page browser menu as illustrated below:
Fig.@count@images:collections@: Hierarchy of collections in the page browser menu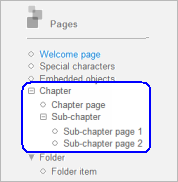
Following is a detailed description of each item in the listing above:
- as it was previously mentioned, the listing above specifies a
hierarchy of two nested collections, with the control block in lines
5...11 representing the "top-level" collection, and the control block
in lines 7...10 representing an "inner collection" contained inside the
top-level collection
- the first control item in line 5 in the listing above
represents the collection's "cover page"; this page will be listed as
"Chapter" in the page browser menu:
(doc2/doc2.html|Chapter|A chapter can group pages, folders, or other chapters)
- the next control item in line 6 in the listing above
represents the first page contained inside
the collection, and it will be listed as "Chapter page" in the page
browser menu:
(doc3/doc3.html|Chapter page)
- the control block in lines 7...10 in the listing above
specifies a collection of items grouped as a "sub-collection" contained inside the higher-level
collection described above; this sub-collection will be shown in
the page browser menu as a hierarchy of documents contained inside the hierarchy of its container
collection:
@[(doc8/doc8.html|Sub-chapter|Sub-chapter with automatically-linked pages)
      (doc8/doc8-1.html|Sub-chapter page 1)
      (doc8/doc8-2.html|Sub-chapter page 2)
] - this sub-collection's "cover page" is the document 'doc8/doc8.html' which is listed as "Sub-chapter" in the page browser menu
- the pages contained in this sub-collection are the
documents 'doc8/doc8-1.html' and 'doc8/doc8-2.html', listed as
"Sub-chapter page 1" and "Sub-chapter page 2" in the page browser menu
- a character '@'
preceding a control block (as is the case
with the sub-chapter listed above) specifies that all successive pages that appear inside
that
control block are automatically linked with each other by
having at the end of said pages a link to the previous and/or next page
contained in the control block:
Fig.@count@images:booklet_page@: Pages in a sub-chapter with automatic previous/next links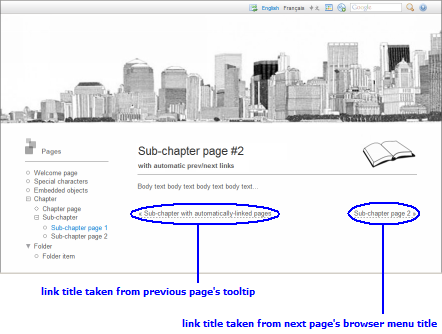
- a sub-collection hierarchy (i.e. a collection-in-collection-in-collection-etc structure) can only have one of the (sub-)collection preceded by a '@' character, and all the pages contained inside that (sub-)collection (i.e. including the pages contained in sub-sub-collections etc) are then linked with each other via previous/next links
- each of the previous/next link displayed at the bottom of an automatically-linked page takes its title either from the linked page's title as displayed in the page browser menu (this is the case of the bottom-right link titled "Sub-chapter page 2" in Fig.@count@images#booklet_page@ above), or from the linked page's tooltip text if such a tooltip exists in the page browser file (this is the case of the bottom-left link titled "Sub-chapter with automatically-linked pages" in Fig.@count@images#booklet_page@ above)
- each collection consists of one
or more pages, with the first page being the collection's "cover page", while the remaining
pages being consider to reside "inside"
the collection
-
finally, the last control block spanning lines 12...14 in Listing @count@listings#page_browser_section@ above illustrates the syntax of a coverless collection:
12     [(|Folder|A folder can group pages, chapters, or other folders)
13        (doc4/doc4.html|Folder item)
14     ]
A coverless collection is similar to a "normal" collection (described in the previous paragraph), with the one difference that the control item that specifies the cover page of a coverless collection (i.e. line 12 above) does not contain a reference to any document; in other words, the control item that specifies the cover page of a coverless collection in line 12 above contains a page title for the collection as it will appear in the page browser menu (namely "Folder"), but clicking on the "Folder" title in the page browser menu will not display any page on the website.
Advanced options
The english-language page browser menu file '_menu.htm' of the WSX template contains, in its last section, a reference to [a local copy of] this WSX tutorial, which illustrates some additional configuration options that can be used throughout the page browser menu; specifically:1 {(Tutorial|/info_icon.png|/wsx_logo.jpg)The syntax of the menu section listed above determines that:
2 (wsx_tutorial/wsx_tutorial.html^WSX Tutorial|The latest version of the
WebsiteExpress tutorial is
available at www.itgroup.ro)
3 }
- the icon of this section is different from the other menu
sections' icons
- the WSX tutorial document opens in a new browser window/tab when
the link is clicked
- the page header that is displayed on the WSX tutorial page is different from the english-language default page header
- the control item in the first line (which determines the section title to be displayed in the page browser menu) contains, apart from the section title string (i.e. "Tutorial"), a set of two WSX absolute links to two files, namely:
- the first file reference '/info_icon.png' determines a "custom" icon to be displayed instead of the default icon next to the section title (i.e. the blue "i" icon)
- the second file reference (i.e. '/wsx_logo.jpg') determines a
"custom" page header image that will be displayed instead of the
english language section's
default page header at the top of the WSX
website's display each time a page from this section will be
displayed (i.e. in this specific case the WSX tutorial page, as this is
the only page that is part of the "Tutorial" section)
- note 1: WSX relative links are
allowed for referencing the two above-mentioned files (i.e. there is no
restriction on using the WSX-relative or WSX-absolute format of links)
- note 2: in order to have a custom page header for a menu
section's pages but no custom icon for the page browser menu section,
then an empty string will have to be used for the custom icon file,
e.g. one could specify the 'wsx_logo.jpg' custom page header without a
custom icon usiong the following syntax for the section title:
(Tutorial||/wsx_logo.jpg)
similarly, one can specify a custom icon for a page browser menu section without specifying a custom page header by simply omitting the page header file:
(Tutorial|/info_icon.png)
- the control item in the second line in the listing above specifies the [only] page contained in this section, namely the "WSX Tutorial" document that is included as part of the WSX template; as it can be seen, the control fields that specify the reference to the WSX tutorial documents and respectively the title to be displayed in the page browser menu are separated by a '^' character (instead of '|'): this indicates that this link will open the corresponding document in a new browser tab/window.
- note: a WSX document that opens in a new tab/window from the page browser menu is displayed as a stand-alone document (i.e. the page browser menu is not displayed in the new tab/window where the document is opened)
The page header files
The page header files are image
files with the predefined
name '_header.jpg',
and they are
used to represent the page header
functional components of each of the language sections of a WSX
website; specifically:
- because each language section on a WSX website has its own page
header, the individual '_header.jpg' image files (each representing the
page header component of one of the website's language sections) are
located in their corresponding
language section sub-folder.
For example, Fig.@count@images#ctrl_header@ below illustrates the location of the english-language page header file '_header.jpg' of the WSX template:
Fig.@count@images:ctrl_header@: The position of the english-language page header file '_header.jpg'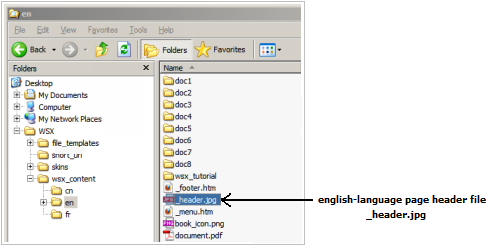
- the visual appearance of a page header image inside the page header element on the WSX display takes into account the width of the image (i.e. the actual width of '_header.jpg') with respect to the width of the WSX display as follows:
- if the width of the page header image is larger than the width of the WSX
display, then the iamge is left-aligned
are right-cropped on the WSX display.
For example, Fig.@count@images#ctrl_header_wide@ illustrates the page header image of the eglish-language section on the WSX template, which is a wide image that is displayed inside the page header element left-aligned and right-cropped:
Fig.@count@images:ctrl_header_wide@: A wide page header image displayed in the page header element of the WSX template's english language section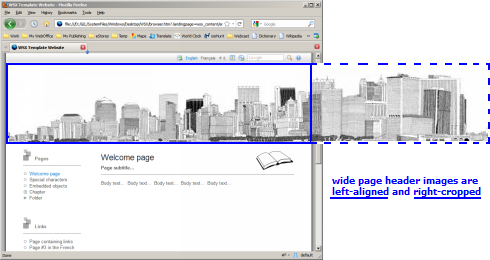
- if the width of the page header image is smaller than the width of the WSX
display, then the iamge is centered
on the WSX display.
For example, Fig.@count@images#ctrl_header_center@ illustrates the page header image of the french-language section on the WSX template, which is a narrow image that is centered inside the page header element:
Fig.@count@images:ctrl_header_center@: A narrow page header displayed in the page header element of the WSX template's french language section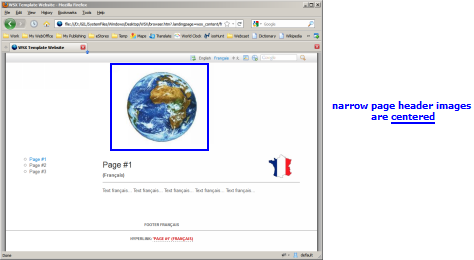
The page footer files
The page footer files are HTML files with the predefined name '_footer.htm', and they are used to represent the page footer functional components of each of the language sections of a WSX website; specifically:
- because each language section on a WSX website has its own page
footer, the individual '_footer.htm' files (each representing the page
footer component of one of the website's language sections) are located
in their corresponding language
section sub-folder.
For example, Fig.@count@images#ctrl_footer@ below illustrates the location of the page footer file '_footer.htm' of the english-language section of the WSX template:
Fig.@count@images:ctrl_footer@: The position of the english-language page footer file '_footer.htm'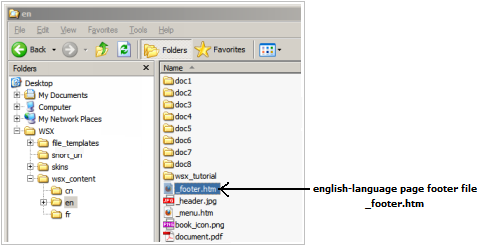
- the contents of a page footer file does not have to have any special formatting, and it is automatically formatted to a default format when it is displayed in the page footer element on the WSX display
- a page footer file is in fact a small WSX document with severe restrictions as to what kind of HTML elements it may contain; namely, the page footer file can contain the following HTML elements:
- text
- hyperlinks
- embedded images
- tables
- horizontal lines (the <hr> tag)
- note: a page footer file is allowed to contain the WSX-specific control strings that can be used inside WSX documents; these control strings will be presented later in this tutorial (e.g. the string "\@(c)@" is the WSX-specific control string for the "©" symbol, etc)
Creating and maintaining a WSX website
The process of creating and maintaining a WSX website essentially involves the following main aspects:
- choosing a well-behaved HTML editor
- creating and maintaining the skeleton file structure of the
website
- creating, organizing, and maintaining the website content
(i.e. the WSX documents and the WSX data files)
- creating the WSX
control
files, and maintaining them consistent with the file structure and
content of the
website when the content and/or
organization of the website changes
Choosing a well-behaved HTML editor
All the HTML files that are part of a WSX-based website, (i.e. the website's WSX documents and WSX control files) share the common characteristic that they are each based on a specific file template which is provided as part of the WSX template kit; then, the process of creating a new WSX document or a new WSX control file consists of importing the corresponding file template in an HTML editor, editing the contents of the template file, and then saving the resulting file as a new WSX document or WSX control file.Given the above, and for the scope of this tutorial, we will use the term "well-behaved HTML editor" for any HTML editor which does not automatically insert/delete/modify any HTML tags when it opens an HTML file for editing (e.g. <!DOCTYPE>, <META>, <STYLE>, etc), and which supports the HTML 4.01 Strict DTD or the HTML 5 specification. Any HTML editor which makes automatic (read: unsolicited) changes to the internal structure of the HTML file that it edits may, or may not, produce WSX template-compatible HTML files.
- for example, the OpenOffice.org 3.x Writer editor is capable of creating and editing HTML documents, but each time Writer opens an HTML document it reformats it by adding, removing, and/or changing a wide range of the original document's tags; furthermore, the kind of formatting that OpenOffice.org 3.x Writer applies to the internal structure of a document each time it saves the document in HTML format makes the edited document incompatible with the WSX template
- alternatively, the KompoZer and BlueGriffon HTML editors, which are based on the Mozilla Gecko engine, both preserve the internal formatting of an HTML document when it is saved after editing, and support the HTML 4.01 strict DTD, thus making them compatible with the WSX template
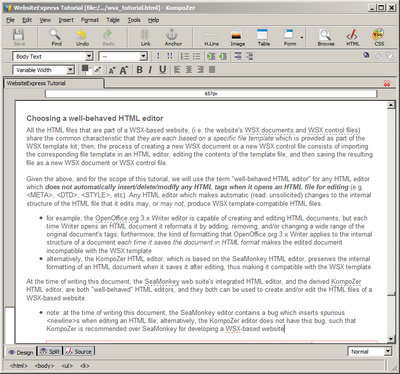
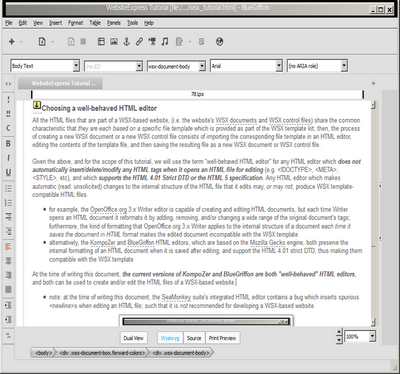
- note 1: at the time of writing this document KompoZer is no longer maintained; however, KompoZer works on WinXP and Win7, and it is cleaner, faster, and more user-friendly than BlueGriffon
- note 2: at the time of writing this document, the SeaMonkey suite's integrated
HTML editor, while being both maintained and "well-behaved", contains a
bug which inserts spurious <newline>s in the HTML
source when editing an
HTML file, such that SeaMonkey is not recommended for
developing a WSX-based website
Creating the skeleton file structure of a new WSX website
The recommended method for creating the skeleton files-and-folders structure for a new WSX-based consists of the following steps:
- one shall start with creating the root folder for the
new WSX website, and give said root folder an appropriate name; for the
purpose
of this tutorial we shall create the new website's root folder on the
Desktop, and we shall name it 'MyNewWebsite':
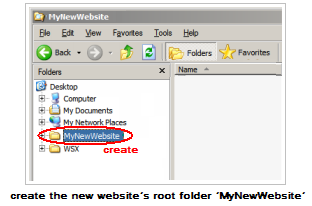
- the next step after creating the root folder of the new website
is to copy all the files and folders contained in the root folder of the WSX
template, except the
'wsx_content' folder, into the root folder of the new website
(i.e. into the
'MyNewWebsite' folder):
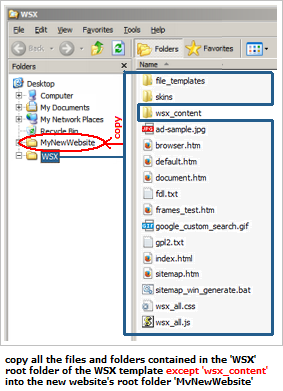
- next, create the 'wsx_content'
folder
inside the new website's root folder:
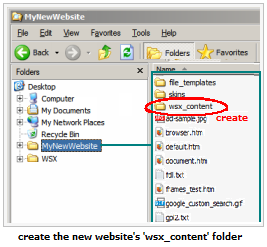
- the last step in creating the basic folder structure of the new
website is to create the language folders inside
the website's 'wsx_content' folder. For the purpose of this tutorial
we shall consider that the new
WSX website ''MyNewWebsite' will be published in english and italian,
and thus we shall create two language folders named 'en' and 'it'
inside the
'wsx_content' folder:
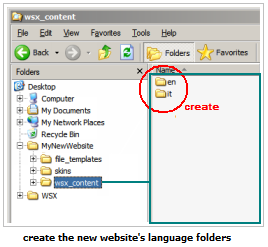
- finally, the new website can now be fitted with
the various mandatory WSX control files,
namely the website-wide control files that must reside directly inside
the 'wsx_content' folder (i.e. '_startup.htm',
'_lang.htm',
'_icon.png',
'_webmaster.htm',
'_sitemap.bat') and the
language-specific control files that must reside inside each of the
language folders of the website (i.e. '_menu.htm',
'_header.jpg',
'_footer.htm');
in order to assist this process, a template
version of the above-mentioned control files has been included
in the WSX template inside a dedicated folder 'file_templates', which is further
divided into two sub-folders:
- the 'WSX_ROOT_FOLDER/file_templates/wsx_content_templates'
sub-folder contains a template version of the website-wide control
files; these files have to be copied directly
in the 'wsx_content' folder
of the new website
- the 'WSX_ROOT_FOLDER/file_templates/lang_templates'
sub-folder contains a template version of the language-specific control
files; these files have to be copied in
each
of
the language folders of
the new website:
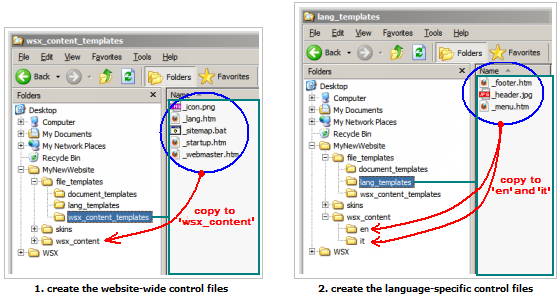
- note: the control file '_sitemap.bat'
has not yet been introduced in this tutorial; its functionality is
detailed later in this chapter
- the 'WSX_ROOT_FOLDER/file_templates/wsx_content_templates'
sub-folder contains a template version of the website-wide control
files; these files have to be copied directly
in the 'wsx_content' folder
of the new website
At this point, the general framework for a new WSX website has been created (i.e. the language folders and the website control files are now in place), and the process of including/editing the actual content can now be started; this is detailed in the next chapter.
Creating the WSX content
The process of creating the content of a WSX website essentially consists of:- authoring the WSX documents, and then embedding said WSX documents within the file structure of the WSX website
- authoring/collecting the WSX
data files, and then embedding said data files within the file
structure of the WSX website
The file structure of a WSX document
As it has been mentioned earlier in this tutorial, a WSX document is a specially-crafted HTML document, and its file structure is similar to that of any standard HTML document. Specifically, a WSX document consists of a mandatory 'skeleton file' of type '.html' which contains the document "body" (i.e. the document text together with any other native HTML elements such as push-buttons, forms, drop-down lists, etc), plus a number of optional 'embedded objects' (e.g. images, movie clips, <IFRAME>s, etc) which are each represented by a separate file; this is illustrated in Fig.@count@images#typical_wsx_document@ below: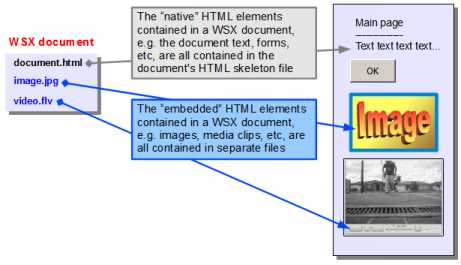
An illustrative example for the file structure of a typical WSX document is represented by the 'Page #3' document contained in the french-language section of the WSX template (see the annotated Fig.@count@images#wsx_document_compact2@ below), where:
- the HTML skeleton file of the 'Page #3' document is 'page3.html',
- the embedded objects contained in the 'Page #3' document consist of two images, namely the two image files 'french_flag.jpg' and 'holding_the_sun.jpg'
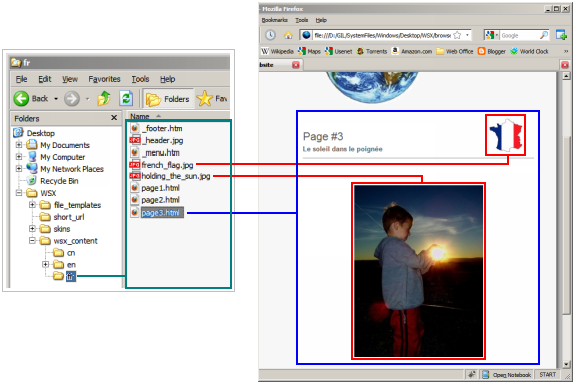
- note: as it can be seen in
Fig.@count@images#wsx_document_compact2@ above, the three files that
together define the 'Page #3' french language document (i.e. the
'page3.html' skeleton file and the 'french_flag.jpg' and
'holding_the_sun.jpg' image files) are all placed together directly
inside the french-language 'fr' sub-folder of the WSX template, and
this "clustering together" of all the file components of a WSX document
inside a laguage sub-folder is the simplest way of including a WSX
document inside a language section of a WSX website. In other words, in
order to include a WSX document inside a language section of a WSX
website, the corresponding document's entire file structure can simply
be placed inside the desired language sub-folder
Organizing the WSX documents' file components
The "clustered" file structure of a WSX document as presented in the
above paragraph (i.e. where all the document's component files are
contained directly inside a language folder) is not a strict requirement for having a WSX
document logically reside inside a given language section; instead, a WSX document will be
considered to logically reside inside a given language section of a
WSX website if the document's HTML skeleton file is included
directly, or indirectly (read: inside a sub-folder), in the
corresponding
language section folder. Apart from this condition, the files that represent the various
embedded objects contained in a WSX document (e.g. embedded images,
embedded videos, embedded <IFRAME>s, etc) can be spread anywhere
inside the 'wsx_content' folder (including any of its sub-folders, or
sub-sub-folders, etc) without restrictions.An illustrative example of a "spread" WSX document file structure is represented by the 'Embedded objects' page contained in the english-language section of the WSX template, which is depicted in the annotated Fig.@count@images#doc7@ below:
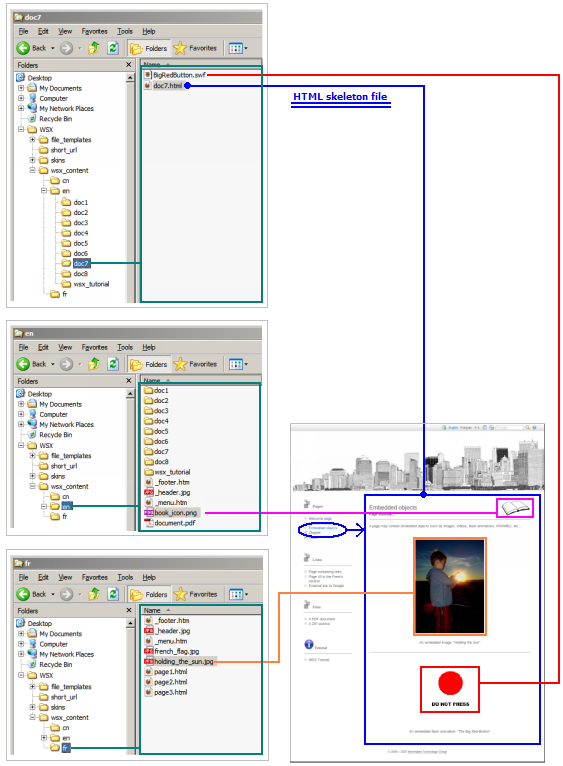
- the page's skeleton file is 'doc7.html' which is contained in the 'doc7'
sub-folder of the english language folder 'en' of the WSX
template, thus making the "Embedded objects" document logically reside
in the english language section of the WSX template
- the page contains 3 embedded objects, namely a book icon (positioned at the top-right of the page), an image titled "Holding the Sun", and a flash animation titled "The Big Red Button"; the 3 individual files that correspond to each of these embedded objects are:
- 'BigRegButton.swf': this is the flash file that corresponds to the "Big Red Button" animation on the page, and it is contained inside the 'doc7' sub-folder of the 'en' folder, together with the 'doc7.html' skeleton file. The decision to have this file placed next to the page's skeleton file inside the 'doc7' sub-folder is meant to hint that the animation object is embedded only in doc7 (i.e. it is part exclusively of the "Embedded objects" page), but this file could have been placed anywhere inside the 'wsx_content' folder (including any sub-folder of the 'wsx_content' folder) of the WSX template
- 'book_icon.png': this image file represents the book icon at the top-right of the page, and it is contained directly in the 'en' language folder. The decision to place this file directly in the 'en' folder (i.e. outside the 'doc7' sub-folder where the 'doc7.html' skeleton file resides) is meant to hint that the book icon image is embedded in multiple WSX documents contained in the 'en' language folder, but this file could have been placed anywhere inside the 'wsx_content' folder (including any sub-folder of the 'wsx_content' folder) of the WSX template
- 'holding_the_sun.jpg': this file represents the image titled
"Holding the Sun" on the "Embedded objects" page, but this image is also embedded in the
french-language 'Page #3' (see Fig.@count@images#wsx_document_compact2@
in the paragraph above for the file structure of the french-language
'Page #3' document). Because the 'holding_the_sun.jpg' file does not
exclusively "belong" to one document but rather it is embedded in [two] different
documents residing in [two] different language sections, the
"proper" logical position of this file would be directly inside the
'wsx_content' folder in order to best hint to the fact that this file
is shared by documents that reside in various language sections
of the
WSX template; however, the file
'holding_the_sun.jpg' has been purposefully placed inside the french
language folder 'fr' in
order to illustrate that a file that
resides in a given language folder (in
this case the 'fr' folder) can be embedded in a document that resides
in a
different laguage folder (in this case the 'en' folder)
Alternatively, an illustrative example of how multiple WSX documents' skeleton
files can be placed together inside a single sub-folder of a
language folder
is represented by the 'doc8.html', 'doc8-1.html', and 'doc8-2.html'
skeleton files, which are all contained inside the 'doc8' sub-folder of
the english-language folder 'en' of the WSX template (these documents
are listed under the "Sub-chapter" heading in the english-language page
browser); this is illustrated in the annotated
Fig.@count@images#docs-in-subfolder@ below:
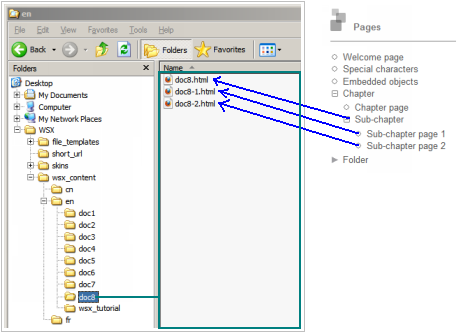
Creating a WSX document
As it has been described in "The file structure of a WSX document" paragraph above, a WSX document is a specially crafted HTML document, and, like any standard HTML document, it consists of an HTML skeleton file plus a number of [optional] embedded objects which are each represented by a separate file. In this context, the process of creating a WSX document consists of creating a working copy of, and then editing, the template document "wsx_document.html" found in the "WSX_ROOT_FOLDER/file_templates/document_templates" folder of the WSX template; namely:- create a workig copy of the document template "WSX_ROOT_FOLDER/file_templates/document_templates/wsx_document.html"provided
by the WSX template, and then rename said working copy to the
desired file name
- author the document content using exclusively a well-behaved HTML editor, i.e. create the textual content of the document, create/collect the embedded objects (e.g. images, movie clips, <IFRAME>s, etc) that will be part of the document, and provide the document title
- finally, the file structure of the document (i.e. the document's skeleton file and its embedded objects files) has to be integrated within the file structure of the WSX website that will host the document
- IMPORTANT: the "wsx_document.html" document contains HTML code which allows a WSX document derived from the "wsx_document.html" document to be properly integrated in a WSX website; as such, it is critical for any WSX document which is intended to be properly integrated on a WSX website to be derived from the "wsx_document.html" document strictly by editing the editable fields of this document (i.e. the page title field, the page sub-title field, the document icon, and the document body)
The document header
The WSX document template "wsx_document.html" found in the "WSX_ROOT_FOLDER/file_templates/document_templates" folder of the WSX template contins a pre-formatted document header which must be used as the basis for all the WSX documents on a WSX website.The document header of the "wsx_document.html" document, as it is displayed in the KompoZer HTML editor, is illustrated in Fig.@count@images#doc_header@ below:
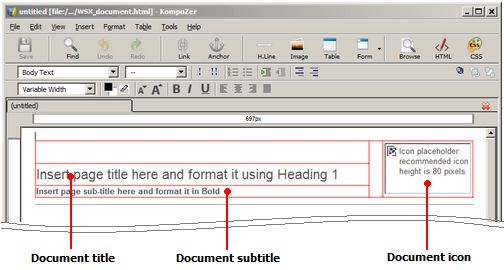
As it can be seen in Fig.@count@images#doc_header@ above, the document header contains three editable fields, namely the document title, the document subtitile, and the document icon, all contained inside a specially-formatted table and followed by a horizontal line. In this context, the process of customizing the document header of a WSX document must be limited strictly to editing the contents of each field, without making any modifications to any of the HTML properties of document's header table (e.g. the number of rows, the size of each table cell, the size of the table, etc, should not be altered in any way).
Basic formatting
The following formatting options can be used inside [the skeleton file of] a WSX document:- unformatted plain text (i.e. no font, bold, color, etc
specifications): this type of text will be automatically formatted
according to the WSX template's presets
- formatted text: font face, bold, italic, underline,
strikethrough, color
- lists:
- numbered
- bullet
- tables (can be fixed-width or full-width):
a table cell can include:
unformatted text formatted text
- list
- ietms
sub-table
images

<embedded objects>
- images:
- left-aligned
- right-aligned
- centered
- with or without border
- HR (horizontal line): inserting a HR can be accomplished via the
corresponding command of the HTML editor, and the styling of the HR is
predefined by the WSX template
Headings
Like any HTML document, a WSX document can contain HTML headings, namely Heading-1 (<H1>) to Heading-5 (<H5>). The Heading-6 (<H6>) has a special role and it is intended to create a frame border around block elements, and in particular around images.Headings can be inserted in the document via the appropriate HTML editor command, and their styling is predefined by the WSX template in order to give a consistent look to the entire WSX-based website.
Automatic table of contents
A WSX document can contain an automatic table of contents which will automatically collect, and indent, all the headings H1 to H5 which follow the position of the table of contents in the document. This table of contents will be displayed only when the document is displayed on the WSX display, i.e. the automatic table of contents will not be shown in the HTML editor during the process of editing the document.The automatic table of contents is inserted in the WSX document by placing the following unformatted text on a separate line:
\@toc@<title_of_table_of_contents>@
where <title_of_table_of_contents> will be the title displayed at the top of the table of contents.
- for example, the title of the table of contents of this tutorial
is "Table of contents", and it is inserted in this document as a
separate line of which contains the following text string:
\@toc@Table of contents@
Automatic counters
In order to ease the authoring of a WSX document, the WSX template includes a mechanism which can provide automatic numbering of categories of items (e.g. a category of items in a document can be images, another category can be tables, yet another category can be notes, etc). By using the automatic counters mechanism, a WSX document can be edited and new items can be added and/or removed anywhere in the document, at any time, and the WSX internal mechanism will ensure that the items in the document are properly numbered (i.e. in sequence, from the first item to the last in each category) when the document is displayed on the WSX display.Creating a new counted item
The following text string in a WSX document creates a new counted item in a category:\@count@<category_name>:<item_name>@
where <category_name> is the category in which the item will be included, and <item_name> is a symbolic name given to the item.
- for example, the following string can be used to number an image
inside a WSX document:
\@count@images:sea_shore_picture@
the string above creates a new item named "sea_shore_picture" as part of a category named "images"
- if the category does not exist (i.e. no item has been previously declared inside said category), then the category will be created and the item will receive the number 1 in the category
- if the category does exist (i.e. at least one item has been previously declared inside said category), then the item will receive the next sequential number in the category (e.g. if two items "\@count@images:blue_sky_picture@" and "\@count@images:skyscraper_picture@" have been declared in the category "images", and a new item "\@count@images:child_picture@" is declared inside the "images" category, then the item "\@count@images:child_picture@" will receive the number 3 in the "images" category)
Referencing a counted item
A counted item (that has been created as described in the paragraph above) can be referenced (i.e. used) anywhere inside a WSX document, both before and after the position where it has been created in the document; specifically, the following text string can be used inside a WSX document to reference a counted item, and this string will be automatically replaced with the numeric value of the counted item when the document is displayed on the WSX display:\@count@<category_name>#<item_name>@
- for example, consider that the item \@count@images:my_picture@ is created as an image label inside a WSX document, and also consider that this item is the first item in the document that is created in the "images" category (i.e. there are no other \@count@images:xxxxxxxxxx@ items created in the document prior to the declaration of \@count@images:my_picture@); then, any occurrence of the string \@count@images#my_picture@ anywhere in the document will be replaced with the string "1" (without the quotes) when the document is displayed on the WSX website.
| Document view in the HTML editor |
Document view on the WSX display |
| The
image in Fig.\@count@img#hie_menu@
below illustrates
a hierarchical menu: |
The
image in Fig.@count@img#hie_menu@
below illustrates
a hierarchical menu: |
Special characters and control strings
The WSX template allows a WSX document to contain several control strings which get automatically translated into special characters when the document is displayed on the WSX display; specifically, each control string has the form \@<control_code>@, where the valid \@<control_code>@ strings are listed below (e.g. \@<<@, \@>>@, \@L@, etc):| Document view in the HTML editor | Document view on the WSX display | |
| \@<<@
Left/right Quotes \@>>@ 23\@L@ \@|@ 35\@E@ \@|@ $50 \@|@ 5000\@Y@ \@C@ Copyright symbol \@R@ Registered trademark symbol \@TM@ Trademark symbol Section \@S@1 Note \@+@1 Ref \@++@1 Current year is \@year@ Current time is \@gmt@ \@.@ 10\@u@F \@+-@10%, i.e. 9\@u@F \@:@ 11\@u@F \@#@ Version 1.0 \@B@2 \@~@(\@...@) |
@<<@
Left/right Quotes @>>@ 23@L@ @|@ 35@E@ @|@ $50 @|@ 5000@Y@ @C@ Copyright symbol @R@ Registered trademark symbol @TM@ Trademark symbol Section @S@1 Note @+@1 Ref @++@1 Current year is @year@ Current time is @gmt@ @.@ 10@u@F @+-@10%, i.e. 9@u@F @:@ 11@u@F @#@ Version 1.0 @B@2 @~@(@...@) |
Caveats
| TODO |
Creating a WSX data file
The process of creating a WSX data file does not involve any special procedure specific to a WSX-based website; instead, the WSX data files are created with the appropriate tools according to the type of data (e.g. an image editor for image data files, or an archive manager for archive data files, etc), and the resulting data file must then be integrated (read: placed and linked) inside the file structure of the WSX website.Creating the WSX control files
As it has been previously explained earlier in this document, the WSX control files determine the functionality and/or the appearance of the functional components of a WSX website, and all the WSX control files of a new WSX website are created as part of the process of creating the skeleton file structure of the website. Then, once the WSX control files have been created (read: cloned from the WSX template), each control file has to be edited and customized according the actual content of the new website.- note: the template WSX control files (which are provided by the
WSX template inside the "file_templates" folder, and which are cloned
during the process of creating the skeleton file structure of a new WSX
website) contain sample code (and
comments) which have been specifically designed to present a
comprehensive illustration of the
format, syntax, and functionality of each control file;
additionally,
the various WSX control files of the WSX template itself can also be
used as a
quick reference for the format and options available for each type
of
control
file
Creating the site index for search engines
A WSX-based website makes heavy use of Ajax technologies for displaying its web pages, and said Ajax technologies hide the page addresses under complex JavaScript functions; in this context, a WSX website should contain a special stie map file which may be useful, or even necessary, for the search engines to properly index the entire content of the website.In order to automate the creation of a search engines-friendly site index, a WSX website provides two script files named "_sitemap.bat" (for use on windows systems) and "_sitemap.run" (for use on linux-based systems), where said two script files can be found inside the "wsx_content" folder of any WSX website after the website's skeleton file structure is created. The result of running [any of] said two scripts is a file named "sitemap.htm" which will be generated inside the website's root folder, whereby the resulting "sitemap.htm" file contains a complete listing of all the WSX documents that are contained in the website (i.e. all the HTML files that have the extension ".html").
- note: the script file "sitemap.bat" is a windows batch file that
is designed for, and should
be run only on, windows
systems, while the script file "sitemap.run" is a linux bash file that
designed for, and
should be run only on,
linux-based systems
Maintaining a WSX website
The maintenance of a WSX website can be thought of as consisting of two types of actions, namely maintaining the website content (i.e. maintaining the WSX documents and/or the WSX data files), and maintaining the website integrity (i.e. keeping the website's WSX control files correctly synchronized with [any changes that are made to] the website content); these two types of actions are discussed in the following two paragraphs.Maintaining the website content
The maintenance of a WSX website content (i.e. the website's WSX documents and WSX data files) involves the same procedures and precautions as for a typical static website, i.e. it consists of adding, moving, removing, renaming, and/or editing, the WSX documents and/or the WSX data files, and updating the hyperlinks contained in the WSX documents (i.e. the WSX hyperlinks to WSX documents and WSX data files, and the file paths of any embedded objects that are part of the WSX documents' file structure) following any changes that are made to the position, and/or to the names, of the website files.Maintaining the website integrity
As it has been previously explained, the WSX control files contain information about the visual appearance and/or functionality of the functional components of a WSX website; in particular, the HTML-type WSX control files (with the file extension '.htm') [may] contain WSX hyperlinks to various files and/or folders on the website, and thus the content of the WSX control files has to be maintained according to the desired functionality of the website, and, additionally, all the WSX control files have to be kept synchronized with the file structure of the website after any change is made to the website's file structure.- example 1: consider a
bi-lingual WSX website published in english and in
french, and consider that the website's home page is defined as the
english-language WSX document '/en/home.html';
in this case, if the
website's home page has to be changed to e.g. the french-language
WSX document '/fr/accueil.html', then the WSX hyperlink contained in
the WSX website's home page selector file
'_startup.htm' has to be changed such that it points to the '/fr/accueil.html'
page (instead of the original '/en/home.html' page):
Original '_startup.htm' file
Modified '_startup.htm' file {(/en/home.html)} {(/fr/accueil.html)}
- example 2: consider a WSX
website which contains an english-language page browser menu which contains a
menu item link to the english-language WSX document 'products.html'; then, consider
that said WSX document is split into two WSX documents, namely a
'current_products.html' WSX document and a 'previous_products.html' WSX
document; in this scenario, the menu link to the original WSX document
'products.html' has to be replaced inside the english section's page browser file '_menu.htm' with two new menu
item links that refer to the two new WSX documents, e.g.:
Original entry in the '_menu.htm' file
Modified entry in the '_menu.htm' file
(products.html|Products)
[(current_products.html|Products)
(previous_products.html|Previous products)
]
Advanced options
| TODO |
Publishing a WSX website
The WSX template has been specifically designed such that a WSX-based website can be easily deployable on even the most simple, and often free, webhosting plans, by reducing the requirements on the webhosting server to the bare minimum of providing a simple HTTP web server, without requiring any of the more advanced assisting technologies such as server-side scripting or data bases. In this context, the process of publishing a WSX-based website consists solely of uploading the contents of the website's root folder to the webhosting server, with no server configuration being required.
- for example, Fig.@count@images#wsx_upload_root@ below illustrates
a
webhosting server which provides each user account with access to the
use account's
file system root, such that uploading a WSX website on such a server
consists of uploading the contents of the website's root folder directly on the server's file system root:
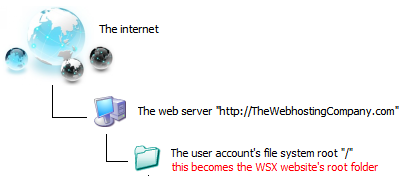 Fig.@count@images:wsx_upload_root@: hosting the content of the root folder of a WSX website on the file system root of a webhosting server
- alternatively, Fig.@count@images#wsx_upload_folder@ below
illustrates a webhosting server which allocates a separate folder for
user each account (the folder 'MyWebsite' in
Fig.@count@images#wsx_upload_folder@ below), such that uploading a WSX
website on such a server will consist of uploading the contents of the
website's root folder into the user
account folder:
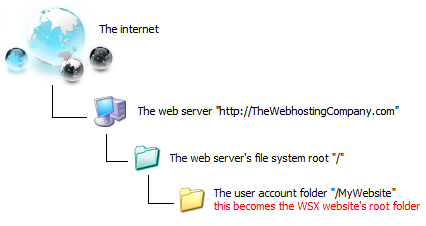 Fig.@count@images:wsx_upload_folder@: hosting the content of the root folder of a WSX website inside a user account folder of a webhosting server
Publishing multiple websites in the same webhosting account
It is possible to publish multiple WSX-based websites into a single webhosting account by uploading the entire root folder of each website (i.e. including the root folders themselves instead of the content of the root folders) into said webhosting account (the root folders of each website must have different names such that they can coexist inside the same user account folder)- for example, Fig.@count@images#wsx_upload_multiple@ below
illustrates two WSX websites whose root folders 'Website1' and
'Website2' are hosted inside a single user account folder 'user005' on
a webhosting server:
Fig.@count@images:wsx_upload_multiple@: hosting two WSX websites inside a single user account folder on a webhosting server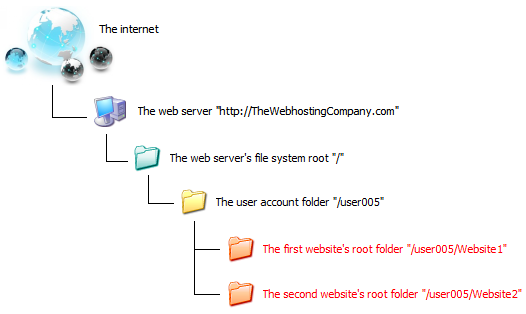
- note: if multiple websites are hosted inside a single user
account on a webhosting server, the URL of each website will consist of
the user account's URL followed by the website's root folder name (e.g.
http://TheWebhostingCompany.com/Website1
and respectively http://TheWebhostingCompany.com/Website2
in Fig.@count@images#wsx_upload_multiple@ above); additionally, the
user account folder may contain an 'index.html' home page which
automatically redirects to the preferred website hosted in the user
account, or it may allow the user to navigate to each of the hosted
websites, etc.
Appendix
The KompoZer HTML editor
The BlueGriffon HTML editor
Hacking
The site skins
The WSX skins are each contained in a separate sub-folder of the "WSX_ROOT_FOLDER/skins"
folder, where each such sub-folder must have a single-letter name. In terms of
internal structure, each skin consists of three customizable layers which are
overlaid on top
of
each other, namely:
- the window background layer (bottom layer)
- the page border layer (middle layer)
- the WSX display styling layer (front layer)
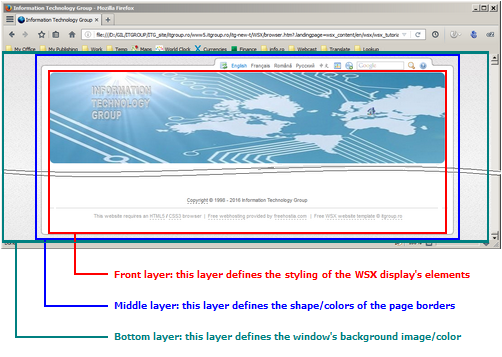
The follwing paragraphs present the structure and customization options available for each of these layers.
The window background layer
The windows background layer is defined by a single background image which is tiled over the entire area of the browser window (i.e. the CSS style is "background-repeat: repeat-x repeat-y"). If the background image is smaller than 1024 pixels then the background image is scrolled on the Y direction together with the window contents, else the background image is held still when the window is scrolled.The window background image of each skin is the file "background-outer.jpg" found inside each skin sub-folder.
The page border styling layer
As its name suggests, the page border styling layer mainly defines the shape (and colors) of the page border on a WSX website. The page borders are defined via a set of PNG images, with one such set of images found inside each skin sub-folder.Fig.@count@images#wsx_skin_boders@ below illustrates the component images which together define the page border for skin 'i' of the WSX-2.0 template:
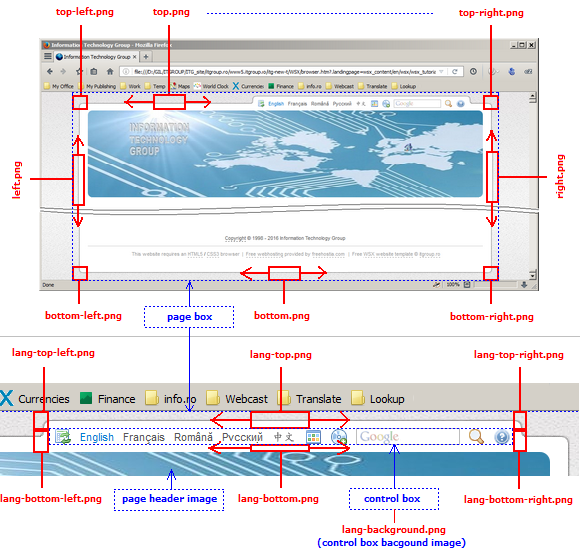
- note: the page border images sided by arrows in
Fig.@count@images#wsx_skin_boders@
above are repeated along the direction specified by the arrows (CSS
style: repeat-x or repeat-y)
- the area surrounded by a dotted blue line and labeled "page box"
contains the full content of the page; this
is the area whose border is skinned by the page border layer
- the area surrounded by a dotted blue line and labeled "control
box" consists of a row of text and
icons which
contain the language selector
element and the toolbox
element
- all component images "XXX.png" except
"lang-bottom.png" are page-bordering
images which have an "interior-facing"
area that neighbors the page content and an "exterior-facing" area that
neighbors the window background: the
interior-facing side of
a page-bordering image defines the color, and possibly a pattern, for
the web page's border, and the exterior-facing area should be
transparent such that it allows the window background layer to be
visible around the web page borders
- for example, the "top-left.png" border image in Fig.@count@images#wsx_skin_boders@
above has the following design:
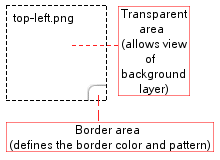
- as a general rule, the area of each page border image that must be covered by the border
drawing/pattern (as opposed to the transparent area of each
image) should be placed oriented
towards the center of the web page, with the special note that,
when applying this rule to the control box border images (see Fig.@count@images#wsx_skin_boders@
above), the control box must be thought
of as being placed
at the center-top of the web page;
this is illustrated in Fig.@count@images#border-attraction@
below:
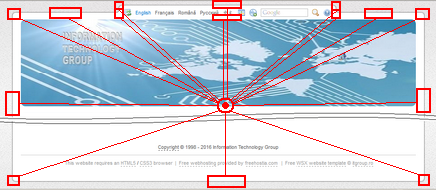 Fig.@count@images:border-attraction@: the border layer images must have their border drawing/patern area oriented towards the center of the web page
- for
example, the border drawing of the "lang-bottom-left.png" image covers
the bottom side, bottom-right corner, and
right side of the image; similarly, the border drawing/pattern of the
"right.png" image covers the left side of the image; the
border drawing/pattern for these two border images of the WSX-2.0
template's
skin 'i' (see Fig.@count@images#wsx_skin_boders@
above) are illustrated below:
lang-bottom-left.png
right.png

- for
example, the border drawing of the "lang-bottom-left.png" image covers
the bottom side, bottom-right corner, and
right side of the image; similarly, the border drawing/pattern of the
"right.png" image covers the left side of the image; the
border drawing/pattern for these two border images of the WSX-2.0
template's
skin 'i' (see Fig.@count@images#wsx_skin_boders@
above) are illustrated below:
- the border drawing/pattern in each pair of adjacent images must "flow" from one image to the other such that said border drawings/patterns match at the junction between two adjacent images
- for example, the design of the border images "left.png",
bottom-left.png", and "bottom.png" of the WSX-2.0 template's skin 'i'
is
illustrated below:
- as a general rule, the dimensions of the images comprising the
page border layer should be chosen just
large enough to hold the [non-transparent] drawing/pattern of
each image, with the following exceptions:
- if a border image has a repetitive drawing/pattern along one direction, and the repeating pattern is relatively short, then the pattern should be repeated inside that image such that the image size along its repetitive direction is about 100 pixels
- for example, the pattern of "top.png" included in skin 'i' of
the WSX-2.0 template's is a 1 pixel-wide repetitive pattern, and thus
the "top.png" image should contain the pattern repeated 100 times along
its width; this is illustrated below:
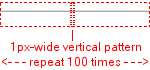
- the width of the transparent areas of the "left.png" and "right.png" images, and the height of the transparent area of the"bottom.png" image, determine the minimum margin that will always be preserved between the border drawing/pattern of a web page and the border of the web browser window on the left, bottom, and right side of the web page, i.e. if a web page is larger, on any dimension, than the display area of the browser window, then the browser window's scrollbar(s) will be displayed, the web page will be scrollable inside the browser window (on one or both directions), and between each of the web page's margins and the browser window there will be a distance as determined by the transparent areas of the above-mentioned page border images
- for example, the [minimum] distance between the bottom-right
corner of a web page and the bottom-right corner of the browser window
is defined by the border images "bottom.png" and "right.png"; this is
illustrated below:
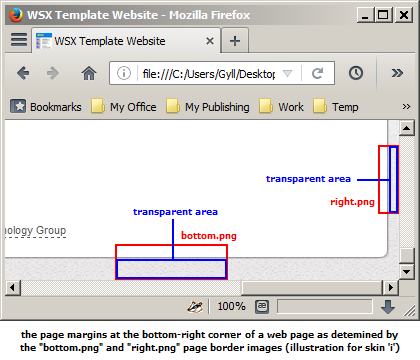
- the height of the "lang-bottom.png" image determines the
vertical spacing between the top
margin of the page header image and the bottom margin of the control
box row (see Fig.@count@images#wsx_skin_boders@
above); this is illustrated below:
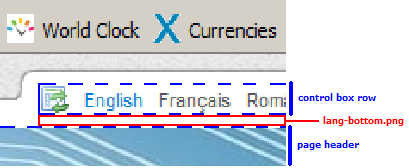
- as it can be seen in Fig.@count@images#wsx_skin_boders@ above, the "lang-top-left.png" and "lang-bottom-left.png" images, and respectively the "lang-top-right.png" and "lang-bottom-right.png" images, are stacked on top of each other, and the border drawing/pattern areas must "flow" vertically inside each pair of stacked images. In this context, the dimensions of the "lang-top-left.png", "lang-bottom-left.png", "lang-top-right.png", and "lang-bottom-right.png" images must be chosen as follows:
- the width of the "lang-top-left.png" and
"lang-bottom-left.png" images on one hand, and respectively
the width of the "lang-top-right.png" and "lang-bottom-right.png"
images on the other hand, must the
same for each pair of stacked images, and said widths
must be exactly
the total width required to hold the width of the compound border
drawing/pattern
area for each pair of stacked images:
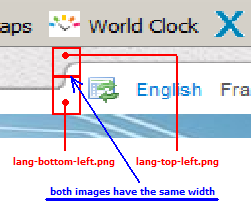
- the height of the "lang-top-left.png" and
"lang-top-right.png" images must be
the same, and it determines the distance between the top
margin of the control box and the top margin of the browser window,
i.e. they
determine the height of the background area that will be visible at the
top of the web page when the web page si scrolled all the way to
the top:
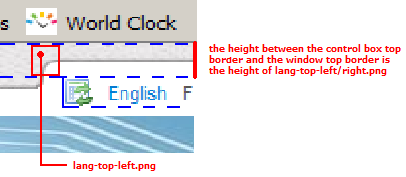
- the
"lang-bottom-left.png" and
"lang-bottom-right.png" images have a special design, namely
they can
be thought of as consisting of two
zones on the vertical axis:
- a bottom zone whose drawing/pattern must make the junction with the "top.png" image on one hand (on the-left hand side and respectively the right-hand side of the control box), and with the "lang-top-left.png" and respectively "lang-top-right.png" images on the other hand (at the top of the images), and
- a top zone which must have a repetitive vertical pattern about 100 pixel-tall, which repeats the top-most line of the bottom zone: the purpose of the top zone is to allow a continuous adjustment of the control box border (on the vertical axis) if the user selects a larger font size in the browser (selecting larger fonts in the browser will translate in having taller fonts in the language selector, which, in turn, will translate in a taller control box)
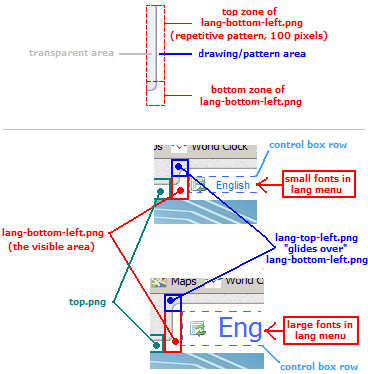 Fig.@count@images:lang-bottom-left-felx@: the design of "lang-bottom-left.png" of the WSX-2.0 template's skin 'i', and how "lang-top-left.png" glides over it depending on the height of the control box
- for example, the design of [the top part of] the page border for
the WSX-2.0 template's skin 'k' is
illustrated in Fig.@count@images#skin-k@ below:
Fig.@count@images:skin-k@: the elememts of the top border of the WSX-2.0 template's skin 'k'
The geometry of the top page border in Fig.@count@images#skin-k@ above is determined as follows:
- out of all the top border's constituent images, the drawing/pattern of the top border is determined exclusively by the drawing/pattern inside the "top.png" image (plus the "top-left.png" and "top-right.png" images on the sides), while all the other images are transparent (the "top.png" image's drawing/pattern "flows" underneath the transparent images throughout the entire width of the top border)
- the vertical arrangement of the top page border is
determined exactly as discussed previously throughout this paragraph
for skin 'i', i.e. the height of "lang-bottom.png" determines how high
the control box row is placed above the page header image, and the
height of "lang-top-left.png" and "lang-top-right.png" (which must be the same) determine the
distance between the
window's top border and the control box row
The WSX display styling layer
The styling of WSX display is defined
separately for each skin
by a set of files located in each skin sub-folder of the skin folder "WSX_ROOT_FOLDER/skins",
as follows:- a set of styling image files: "menu-width.png", "page-width-and-header-underline.png", and "background-inner.png"; and
- a CSS text file: "skin.css"
The styling images
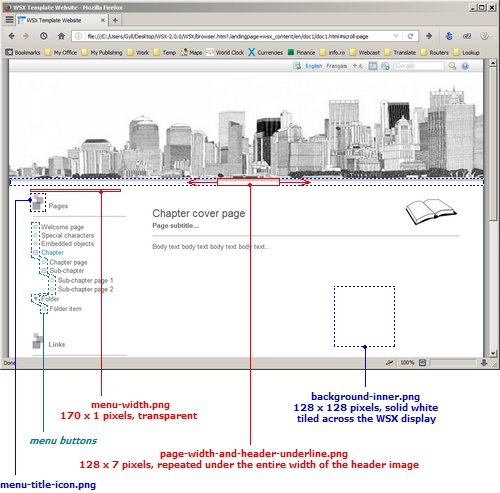
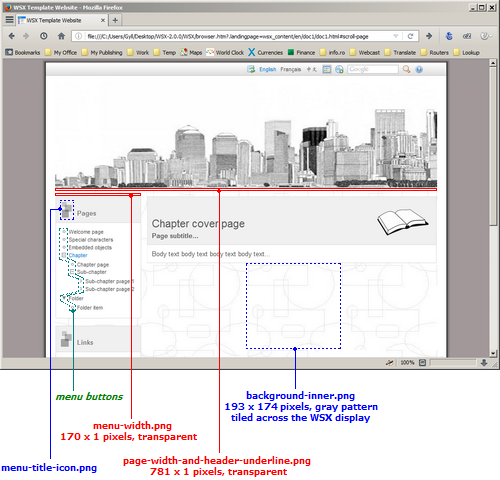
The following rules apply for the "menu-width.png", "page-width-and-header-underline.png", and "background-inner.png" styling images:
- the "menu-width.png" image must be transparent, it has a mandatory height of 1 pixel,
and its width determines the minimum
width
of the page browser menu
when the browser window is shrunk horizontally, i.e. the page browser
menu will never become narrower than the width of "menu-width.png"
- the "page-width-and-header-underline.png" image is displayed
right below the page header image, and
its width controls the width of
the WSX display, namely:
- if the width of "page-width-and-header-underline.png" is smaller than 256 pixels then the WSX display will be stretched over the entire width of the browser window (excluding the page borders), and the "page-width-and-header-underline.png" image will be repeated horizontally below the page header image throughout the entire width of the WSX display
- for example, the width of the
"page-width-and-header-underline.png" image in the WSX-2.0 template's
skins 'b' is 128 pixels, such that the
WSX display will be stretched over the entire width of the browser
window (excluding the page borders) when skin 'b' is selected (see Fig.@count@images#skin-b-style-img@
above)
- alternatively, if the width of the "page-width-and-header-underline.png" image is larger than 256 pixels, then the width of the "page-width-and-header-underline.png" image will determine the width of the WSX display
- for example, the size of the
"page-width-and-header-underline.png"
image in the WSX-2.0 template's skins 'k' is 1 pixel tall and 781 pixels wide (i.e. wider than
256
pixels), and thus said width determines the width of the WSX
display (see Fig.@count@images#skin-k-style-img@
above)
- the height and drawing/pattern of the
"page-width-and-header-underline.png" image determins its aspect on the
WSX display, namely: the "page-width-and-header-underline.png" image
may be
transparent and only 1 pixel tall,
in which case it will be invisible
on the WSX display and its sole purpose is to
control the WSX display's width (this is the case for e.g. the WSX-2.0
template's skin 'k', see Fig.@count@images#skin-k-style-img@
above), or, alternatively, it may be 1
or more pixels tall
and contain a drawing/pattern, in which case the width of the image
will
control the width of the WSX display and
the image pattern will be
displayed below the page header image, repetitively along the entire
bottom border of the page header image (this is the case for e.g. the
WSX-2.0 template's skin 'b', see Fig.@count@images#skin-b-style-img@
above)
- the "background-inner.png" image determines the
background of the WSX display area,
its recommended size should
be over
100x100 pixes (for rendering performance reasons), and it is tiled both
horizontally and vertically "under" the entire area of the WSX display
- for example, the "background-inner.png" image of the WSX-2.0
template's skin 'b' contains a solid white color bloc 128x128 pixels in
size (see Fig.@count@images#skin-b-style-img@
above), while skin 'k' contains a
pattern of pale-gray shapes, 193x174 pixels in size, which will
be visible (as a background image) across the WSX display area when
skin 'k' is selected (see Fig.@count@images#skin-k-style-img@
above)
The following rules apply for the "menu buttons" icons:
- the "menu buttons"
icons should have a transparent background (this will allow the
'background-inner.png' image to "pass though"), and all the menu
buttons
icons should have the same size for
a given skin (this will provide
proper horizontal alignment of the page browser menu items)
- the 'hint.png' icon [of each skin] is the image that is displayed under the cursor when the cursor hovers over a menu button; in this context, the height of [each skin's] 'hint.png' icon (which should be the same as the height of all the other menu buttons) determines the font size used in the page browser menus (for the corresponding skin), namely:
- if the height of 'hint.png' is <= 9 pixels then the fonts used in the page browser menu will be smaller than the fonts used in the document viewer area;
- alternatively, if the height of 'hint.png' is >9 pixels then the font size used in the page browser menu will be the same as in the document viewer area
- for example, the WSX template's skin 'b' has "large" menu buttons (i.e. their height is >9, see Fig.@count@images#skin-b-style-img@ above) and thus the font sizes in the page browser menu and in the document viewer are the same;
- alternatively, skin 'k' has "small" menu buttons (i.e. their
height is <=9, see Fig.@count@images#skin-k-style-img@
above) and thus the font size in the page browser menu is smaller then
the font size in the document viewer area
- note: for skins which
define small menu buttons (i.e. their height is <=9) it is still
possible to force the font sizes in the page browser menu to be the
same as in the document viewer by specifying the skin modifier '^' in
the language selector file (see the Skin
options paragraph)
The "skin.css" styling file
This paragraph assumes the reader has (at least) some basic experience with applying CSS styling to HTML web pages. At the time of writing this document, a comprehensive description of CSS3 can be found here, and a concise presentation of the order in which the CSS styles are applied to an HTML element is available here.
The "skin.css" files present [one such file] in each skin sub-folder of the WSX template's skins folder "WSX_ROOT_FOLDER/skins" can control via CSS statements certain aspects of the visual appearance of various elements and areas of the WSX display; in this context, Fig.@count@images#wsx-display-css@ below illustrates the class names associated with the skinnable elements and areas of the WSX display (the illustration represents WSX-2.0's skin 'i'):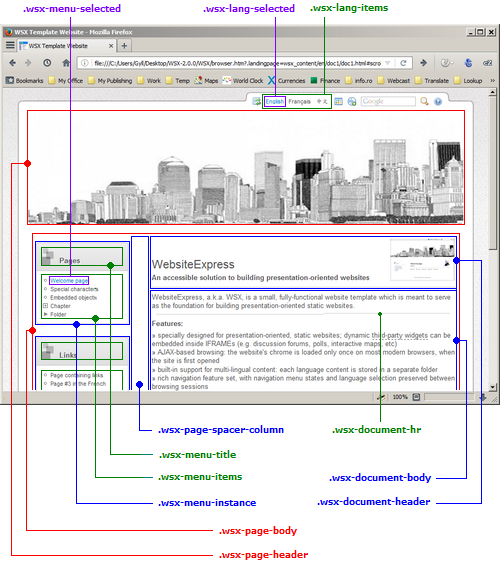
(illustration for the WSX-2.0 template's skin 'i')
Following is the complete list of CSS properties that can be set for each element/area annotated in Fig.@count@images#wsx-display-css@ above (all the elements/areas are class names):
-
* {           /* this defines the default front on the entire website */
   font-face  /* ATT: the '*' selector must be placed the first in 'skin.css' */
   font-size
   color
} -
.wsx-page-header {
   margin*
   border*
} -
.wsx-page-body {
   margin*
   border*
} -
.wsx-page-spacer-column {
   width
} -
.wsx-lang-items {
   font-size
   color
} -
.wsx-lang-selected {
   color
} -
.wsx-menu-instance {
   margin-top
   margin-bottom
} -
.wsx-menu-title {
   color
   background-color
   background: linear-gradient
   text-shadow
   padding*
   border*
} -
.wsx-menu-items {
   color
   background-color
   background: linear-gradient
   padding*
   border*
} -
.wsx-menu-selected {
   color
} -
.wsx-document-header {
   color
   background-color
   background: linear-gradient
   text-shadow
   padding*
   border*
} -
.wsx-document-body {
   color
   background-color
   background: linear-gradient
   padding*
   border*
} -
.wsx-document-hr {  /* the styling of <HR> elements inside the WSX documents */
   color
} -
.wsx-document-selected-toc { /* the styling of a clicked chapter link
   color                        in a WSX document's table of contents */
}
- note 1: a trailing
character '*' at the end of a property name in the list above means
that property name can be used as such, or with a modifier, e.g.
the notation "border*" means that any of "border", "border-top",
"border-width",
border-color", etc, can be used
- note 2: the effect of adding/changing properties in the various CSS classes annotated in Fig.@count@images#wsx-display-css@ above can be easily observed by opening the WSX template, selecting a skin, and then adjusting that skin's CSS properties (followed by a reload in the web browser)
IMPORTANT:
- when editing/defining the CSS file for a given skin, only change/define the CSS properties which are listed above for each CSS class; changing/defining a CSS property for a given CSS class which is not listed above inside that class is not recommended as it may result in layouts which are very hard to understand (and control) without a full understanding of the inner workings of the CSS skinning engine
- for all the CSS properties that define dimensions on the left-
and right-hand side of
elements (i.e. padding, border, margin) always use the same
values for the ***-left and ***-right properties; this will
allow the skinning engine to properly swap the
the page browser element with the document viewer element when the '>' skin option is used
Gotchas
What's next
- Replace XMLHttpRequest() with hidden IFRAME(s) for content
loading: this
should
allow
the WSX template to be used in
offline mode with most modern browsers. At the time of writing
this document, only Gecko-based browsers (Mozilla) can open the WSX
template in
offline mode
- Add an advertising area
History
WSX-2.3.0
- Added support for single-column mobile-friendly layout
WSX-2.0.0
- Simplified the file structure of the page border skins
- Introduced new CSS3 skinning engine for the page contents area
- Updated the WSX document template to be skinnable (WSX_ROOT_FOLDER/file_templates/document_templates/wsx_document.html)
- Updated all the pages of the WSX template to skinned versions
- Updated the WSX tutorial to reflect the changes in the skin options
- Added a skin internals description/hacking chapter
- IMPORTANT: ANY WSX DOCUMENT BUILT FOR THE WSX-1 TEMPLATE CANNOT
BE SKINNED BY THE WSX-2 SKINNING ENGINE; a WSX-1 document can be
converted to WSX-2 by simply copying, one by one, each element of the
document's page header, and then the document's page body, inside a new
WSX document which is created based on the new document template
provided by WSX-2
WSX-1.0.0
- initial stable release